# Welcome to Clouddley Documentation.

Explore Clouddley Docs for in-depth insights into our platform, features, integrations, and expert tips for using them effectively.

### What is Clouddley?

Clouddley is a backend infrastructure for your compute resources, including virtual machines, servers, and bare metal. It provides zero-downtime deployment capabilities, ensuring your application remains accessible during updates and maintenance. Using the **BYOC (Bring Your Own Cloud)** model, Clouddley enables you to deploy across multiple cloud providers, including AWS EC2 Instances, DigitalOcean Droplets, GCP Compute Engine, and many more. This makes it an excellent solution for smooth application deployments, database management, broker set-up and many more.

### Our Products

Here’s a brief overview of what we offer, along with detailed documentation to guide you.

<table data-card-size="large" data-view="cards"><thead><tr><th></th><th align="center"></th><th data-hidden data-card-target data-type="content-ref"></th><th data-hidden data-card-cover data-type="files"></th></tr></thead><tbody><tr><td><p>Apps</p><p></p><p>Deploy Apps on your virtual machines, servers &#x26; bare metal. You can deploy Dockerfiles, view real-time application logs, and add a custom domain.</p><p>  </p></td><td align="center"></td><td><a href="/pages/zQJQP8UpFgzUjFOliZHy">/pages/zQJQP8UpFgzUjFOliZHy</a></td><td><a href="/files/3NRxViStK0o8729WVhho">/files/3NRxViStK0o8729WVhho</a></td></tr><tr><td><p>Databases        </p><p></p><p>Deploy and manage databases like Redis, MySQL, MariaDB, and PostgreSQL on your virtual machines. </p></td><td align="center">  </td><td><a href="/pages/OYAyMRgFwZk1ywVtc1lS">/pages/OYAyMRgFwZk1ywVtc1lS</a></td><td><a href="/files/5F1ErnEIb4L4zqiYHKJ0">/files/5F1ErnEIb4L4zqiYHKJ0</a></td></tr><tr><td><p>Brokers <mark style="background-color:blue;">Coming Soon…</mark> </p><p></p><p>Deploy services like NATS and RabbitMQ on virtual machines.    </p></td><td align="center"></td><td></td><td><a href="/files/NjEhof03JopMd0eAIuX9">/files/NjEhof03JopMd0eAIuX9</a></td></tr><tr><td><p>AI  <mark style="background-color:blue;">Coming Soon…</mark></p><p></p><p>Deploy open-source LLMs on your VM effortlessly using an OpenAI-compatible API.</p></td><td align="center"></td><td></td><td><a href="/files/6S6CN4n3sfMoPmFvGlol">/files/6S6CN4n3sfMoPmFvGlol</a></td></tr></tbody></table>


# Apps

An overview of running applications on Clouddley, its key features to help you get started.

<figure><img src="/files/7hiMQsGBbJLWH1hAlqJu" alt="Image of Apps dashboard."><figcaption><p>Apps Dashboard</p></figcaption></figure>

### Overview

Apps represent your application workloads deployed on Clouddley running on virtual machines, servers, and bare metal with zero downtime. Using cloud-native tooling, it automatically detects your runtime, whether it's **Python, Go, Ruby, or any other language**, and handles the deployment for you. Just connect your repo with or without a Dockerfile, and Clouddley takes care of the rest. This makes it a great solution for web applications, APIs, microservices, and high availability across different cloud environments.

### Key Features

Here is a breakdown of key features Apps supports;

* **GitHub and Bitbucket Integration**

  Connect your GitHub or Bitbucket repositories to enable automated deployments directly from your codebase, ensuring smooth version control and continuous integration workflows.
* **Multiple Operating Systems**

  Deploy and manage applications across various operating systems, including Ubuntu, Debian, CentOS and many more, to ensure extensive compatibility in both development and production environments.
* **Multi-framework and Multi-language support**

  Deploy applications created with a variety of frameworks and programming languages, providing you with flexibility across various technology stacks.
* **Dockerfile integration**

  Effortlessly deploy containerized applications with Dockerfiles to maintain consistent, portable environments across diverse systems.
* **Deployment and Application Logs**

  Gain access to detailed logs for deployments and applications, enabling real-time monitoring and efficient troubleshooting.
* **Scalability Options**

  Easily scale applications to meet demand to maintain optimal performance under varying loads.
* **Pause and Resume Deployments**

  Pause and resume deployments temporarily as needed, offering flexibility for maintenance, debugging, or scheduled downtimes without interrupting workflows.
* **Email Notification**

  Receive email alerts for important deployment events, keeping you updated in real-time on the status and health of your applications.
* **Instant, Automatic and Manual Rollbacks**

  Quickly revert to previous versions using the Apps rollback feature, which allows for automatic rollbacks on failure, instant, and manual rollbacks for added control.
* **Custom Domain Configuration**

  Configure custom domains for your applications to improve branding and accessibility for users.

{% content-ref url="/pages/UOMnjrpko0b2UvKmUt0K" %}
[How-to Guides](/apps/how-to-guides)
{% endcontent-ref %}

{% content-ref url="/pages/VGINbGG5NDARoYw8jk4G" %}
[Extras](/apps/extras)
{% endcontent-ref %}


# How-to Guides

Learn how to deploy different apps to Clouddley.

<table data-view="cards"><thead><tr><th></th><th data-hidden data-card-cover data-type="files"></th><th data-hidden data-card-target data-type="content-ref"></th></tr></thead><tbody><tr><td>Deploy a Ruby on Rails App on Clouddley</td><td><a href="/files/SJceS3IUs0RbKEbDaJSg">/files/SJceS3IUs0RbKEbDaJSg</a></td><td><a href="/pages/d4NmeESuRxUyHxu8clFD">/pages/d4NmeESuRxUyHxu8clFD</a></td></tr><tr><td>Deploy a Next.js App on Clouddley</td><td><a href="/files/HEcCmQ2wLjUHOlJgAJdy">/files/HEcCmQ2wLjUHOlJgAJdy</a></td><td><a href="/pages/s80jSPl4u7CYyAygiptR">/pages/s80jSPl4u7CYyAygiptR</a></td></tr><tr><td>Deploy a Go Application on Clouddley</td><td><a href="/files/TFSuYjBLr6fTGoOFiAjT">/files/TFSuYjBLr6fTGoOFiAjT</a></td><td><a href="/pages/67hkZjbMQvNC3cWTyPcf">/pages/67hkZjbMQvNC3cWTyPcf</a></td></tr><tr><td>Deploy a NestJS App on Clouddley</td><td><a href="/files/Erg2tDyhGgnNyvq615hN">/files/Erg2tDyhGgnNyvq615hN</a></td><td><a href="/pages/8lxPNe47Q4AWpsgO96Nz">/pages/8lxPNe47Q4AWpsgO96Nz</a></td></tr><tr><td>Deploy a FastAPI App on Clouddley</td><td><a href="/files/LfJa3UyFv3HKULoFkSAh">/files/LfJa3UyFv3HKULoFkSAh</a></td><td><a href="/pages/99DssvkCXnNMJkDMEdLd">/pages/99DssvkCXnNMJkDMEdLd</a></td></tr><tr><td>Deploy a .NET Core App on Clouddley</td><td><a href="/files/vcw8uQouyhi9FWrB1de3">/files/vcw8uQouyhi9FWrB1de3</a></td><td><a href="/pages/SiyBt51GuXI0SGMfsi5D">/pages/SiyBt51GuXI0SGMfsi5D</a></td></tr><tr><td>Deploy a Flask App on Clouddley</td><td><a href="/files/Ag2pc6JbV8UAbsN03RDy">/files/Ag2pc6JbV8UAbsN03RDy</a></td><td><a href="/pages/u70ElRJYNhmq41SzHA5K">/pages/u70ElRJYNhmq41SzHA5K</a></td></tr><tr><td>Deploy an Express.js Application on Clouddley</td><td><a href="/files/BRLHrmm6zcZHmNKKZWlD">/files/BRLHrmm6zcZHmNKKZWlD</a></td><td></td></tr></tbody></table>


# Deploy a Ruby on Rails App on Clouddley

Learn how to deploy a Ruby on Rails app on Clouddley.

In this guide, you'll learn how to deploy a[ Ruby on Rails](https://rubyonrails.org/) Application on Clouddley, a backend infrastructure for your compute resources that is an advanced runtime auto-detection platform for zero-downtime deployments across different server types. Let's begin!

### Prerequisites

* A [GitHub](https://github.com/) or [Bitbucket](https://bitbucket.org/product) account.
* A [Clouddley](https://clouddley.com/) account.
* A [Ruby on Rails](https://rubyonrails.org/) application.
* A virtual machine on a Cloud platform or bare metal server.

### Deploy your Ruby on Rails Application

#### **Create a Dockerfile**

Before deploying your Ruby app on Clouddley, create a Dockerfile   `triggr.dockerfile`  which defines how the Ruby app should be containerized.

{% hint style="info" %}
**Best Practice:** When creating a Dockerfile, use a lightweight base image to reduce image size. Always specify exact versions for dependencies to ensure consistency.
{% endhint %}

{% code title="triggr.dockerfile" %}

```docker
FROM ruby:3.4.4-alpine

# Install only the essentials for your gems
RUN apk add --no-cache \
    build-base \
    yaml-dev \
    nodejs \
    yarn \
    tzdata \
    git

# Set working directory
WORKDIR /app

# Copy Gemfile and Gemfile.lock first (for caching)
COPY Gemfile Gemfile.lock ./

# Install gems
RUN bundle install

# Copy the rest of the application
COPY . .

EXPOSE 3000

CMD ["rails", "server", "-b", "0.0.0.0"]

```

{% endcode %}

**Building and Running the Container Locally**

Before deploying to **Apps**, verify that the container works locally.

1. **Build the Docker image**:

   ```
   docker build -t ruby-app -f triggr.dockerfile .
   ```
2. **Run the container**:

   ```
   docker run -d -p 3000:3000 --name ruby-container ruby-app
   ```
3. **Verify the app is running** by visiting `http://localhost:3000`

#### **Accessing Apps on Clouddley**

* Open your browser and log in to your Clouddley account
* Navigate to [Apps](https://app.clouddley.com/apps) and click on **Deploy App**

<figure><img src="/files/7hiMQsGBbJLWH1hAlqJu" alt="Image of Triggr Apps dashboard."><figcaption><p>Accessing Apps on Clouddley</p></figcaption></figure>

#### **Step 1: Configure Service**

* Choose your Git hosting service; either **GitHub** or **Bitbucket**. For this tutorial, we will be using GitHub.
* Click on **Continue with GitHub**

<figure><img src="/files/wGRJv4utI9yHwvgWvVAW" alt="Configuring Git hosting service during app deployment on Apps."><figcaption><p>Choose your Git hosting service</p></figcaption></figure>

#### **Step 2: Configure Git**

* To connect your GitHub user or organization account, click the **Select username/organization** dropdown and **Add GitHub account.**
* Select your **repository** and the **branch** from the dropdown list or quickly search.
* Click on **Next**

<figure><img src="/files/faCh2Fru8KlKWXlPPYOT" alt="Configuring the Git repository during app deployment on Apps."><figcaption><p>Setup the Ruby on Rails application repository on Clouddley</p></figcaption></figure>

#### **Step 3: Configure your Virtual Machine**

In the Choose or add server dropdown, select your virtual machine (VM) if it’s already listed. If not, select **+ Add Virtual Machine**.

Enter the following details to configure your VM:

* Hostname or IP address
* Username
* SSH port

After adding the details, use the **Clouddley CLI** (recommended) or connect via **SSH** to verify the connection.

{% tabs %}
{% tab title="Clouddley CLI" %}
The Clouddley CLI is a command-line tool that allows you to interact with the Clouddley Platform from your terminal.&#x20;

* Open the command line of the remote VM you want to configure to Clouddley and install Clouddley CLI by running the command:

```bash
curl -L https://raw.githubusercontent.com/clouddley/cli/main/install.sh | sh
```

* To add the SSH public key, run the command:

```bash
clouddley add key
```

Using the CLI, you can deploy resources, manage configurations, and automate tasks efficiently.
{% endtab %}

{% tab title="SSH" %}

* Download the public key to your local machine.
* Run the provided command on your local machine, allowing Clouddley to connect to your virtual machine.

```
ssh-copy-id -f -i ~/path/to/downloaded/Publickey username@ipaddress
```

{% hint style="info" %}
Replace `~/path/to/downloaded/Publickey` ,`username` and `ipaddress`  with your actual values.
{% endhint %}
{% endtab %}
{% endtabs %}

* Click on **Verify**. This verifies the connection.
* Click on **Next**

<figure><img src="/files/qtcRfmLeUDV5fe8r7nQk" alt="Configuring the virtual machine during app deployment on Clouddley"><figcaption><p>Configuration of virtual machine on Clouddley</p></figcaption></figure>

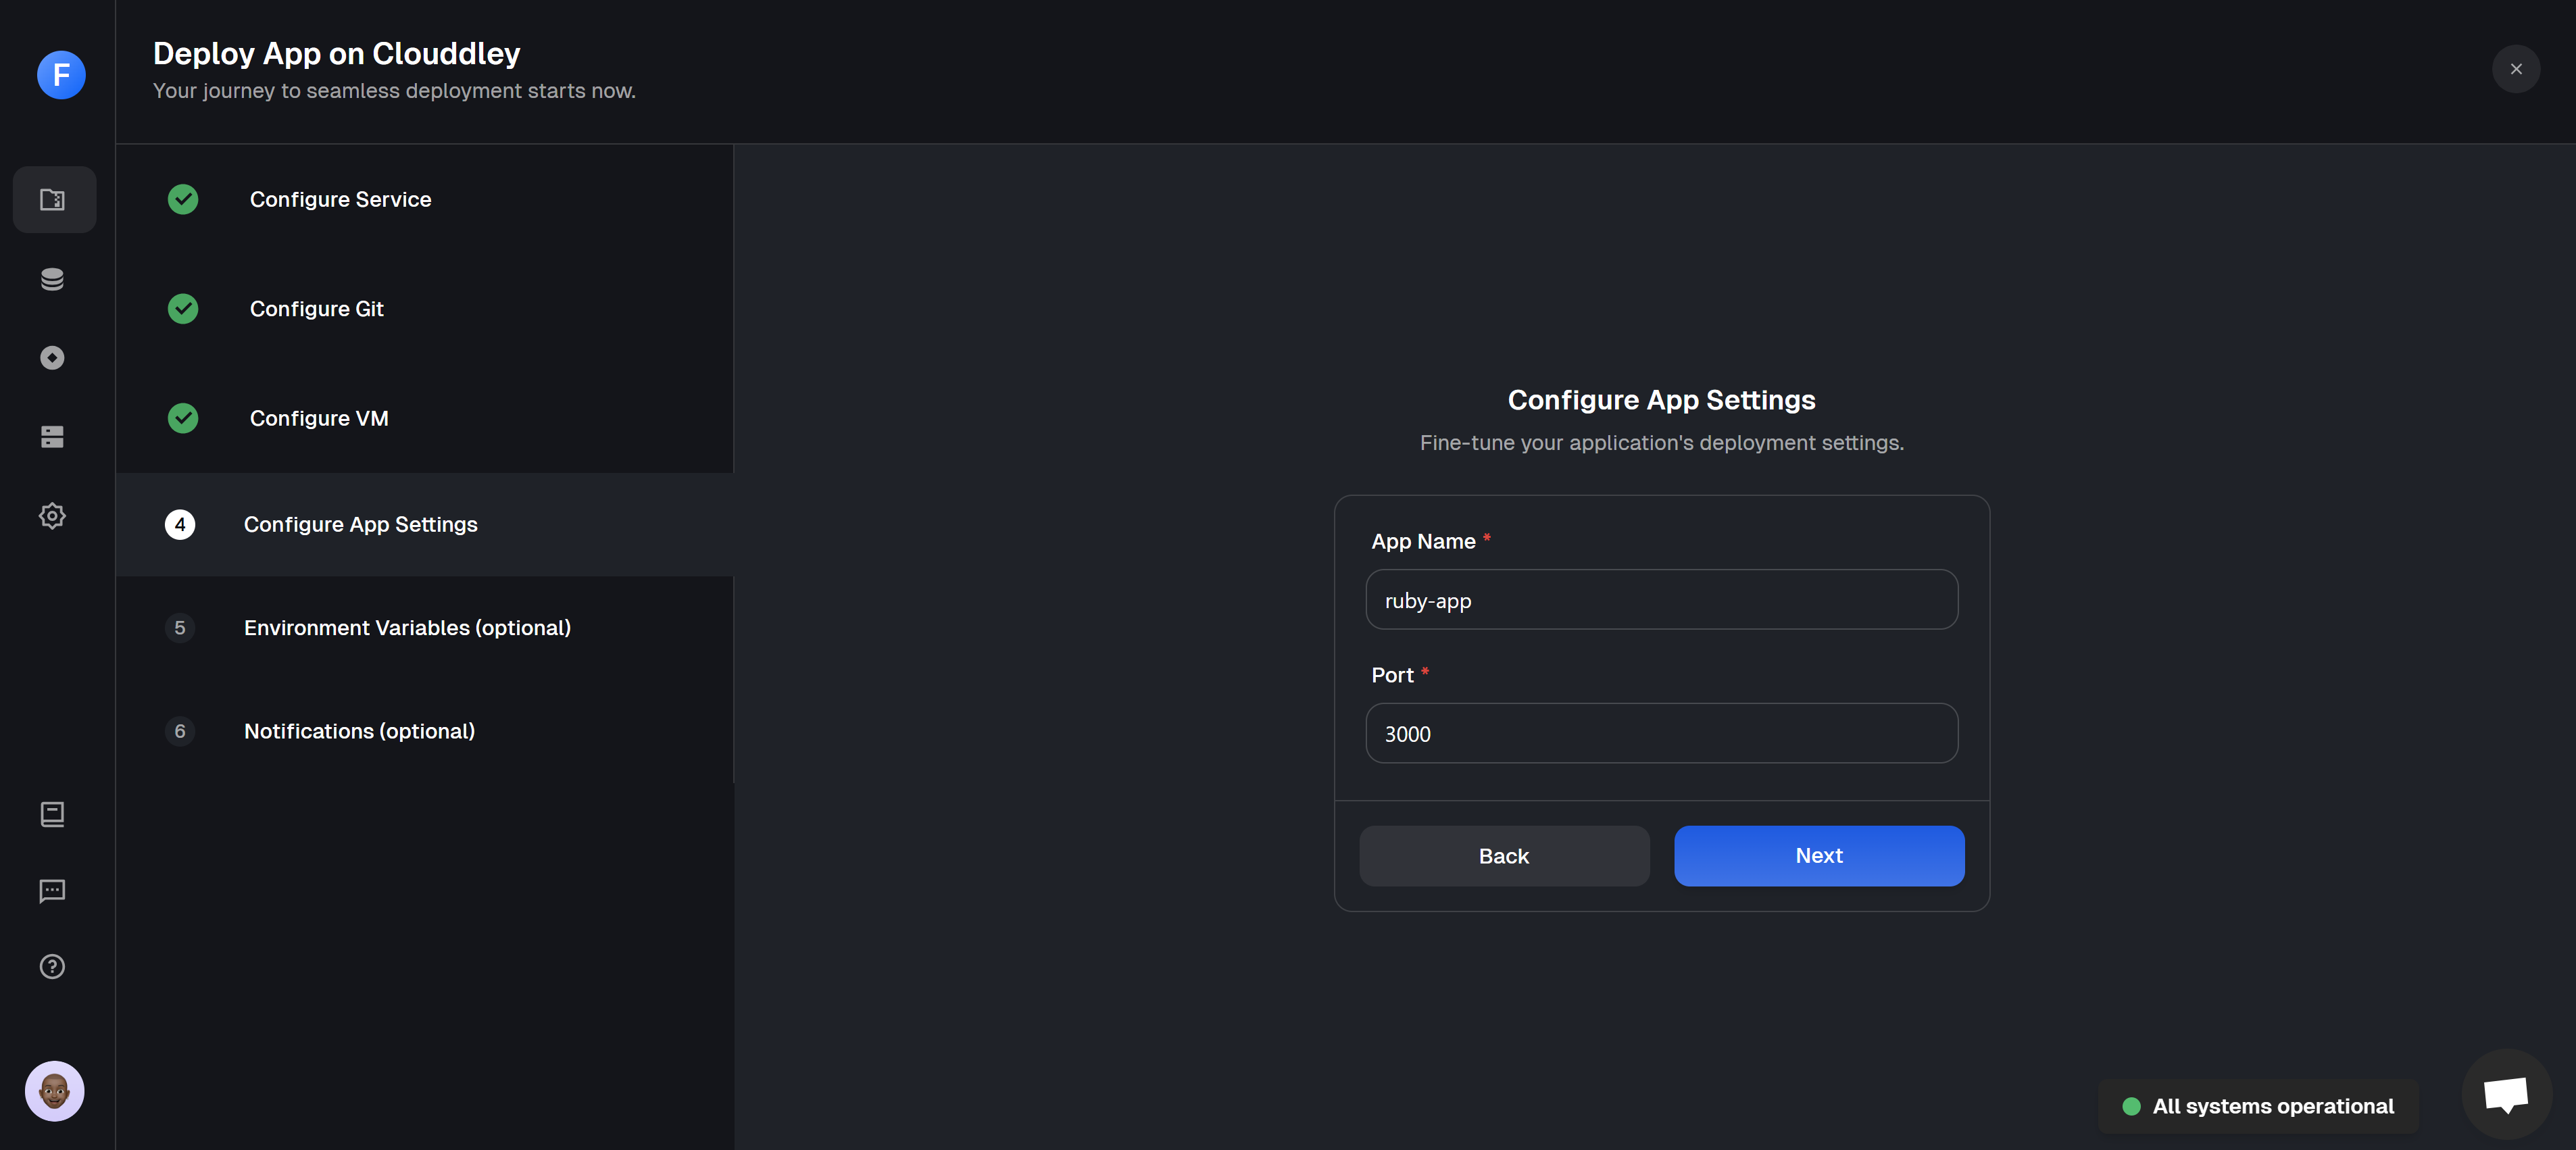
#### **Step 4: Configure app settings**

* Insert the **name** of the application and its **port.**
* Click on **Next**

<figure><img src="/files/RVCroarpRMr24smIvDFF" alt="Configuring App settings (name and port) during app deployment on Clouddley"><figcaption><p>Configure the App name and port</p></figcaption></figure>

{% hint style="info" %}
The firewall of the virtual machine should allow access to the application port.
{% endhint %}

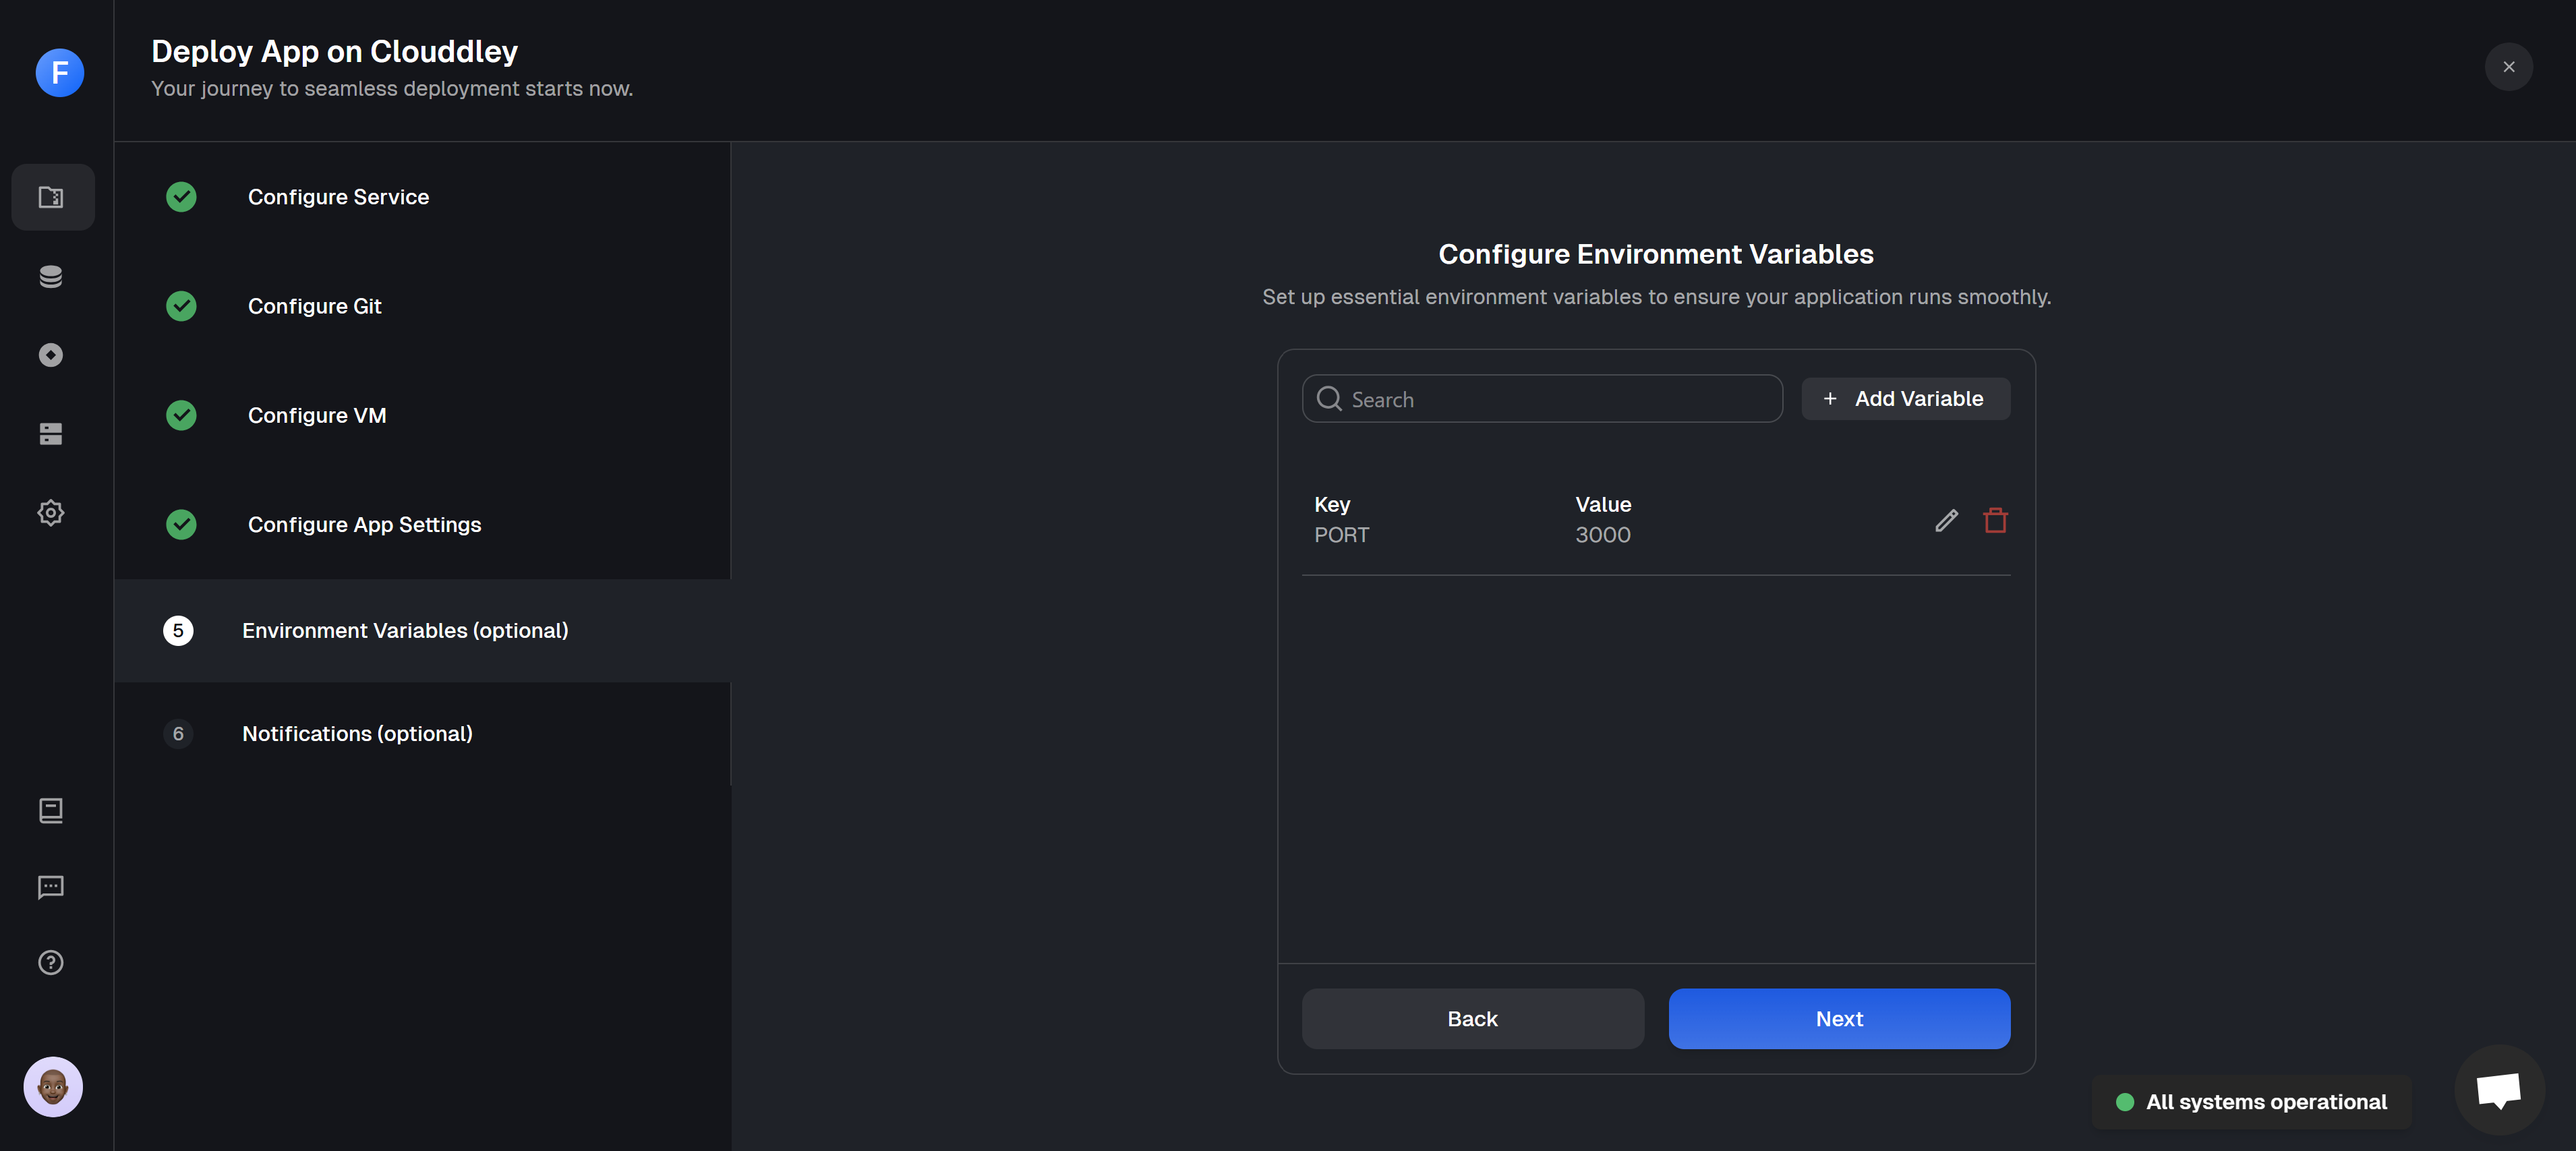
#### **Step 5: Configure Environment Variables**&#x20;

* To add environment variables, click on  :heavy\_plus\_sign: <mark style="color:blue;">**Add Variable**</mark>&#x20;
* Choose an ENV mode: either a **single variable** or **import variables**. Learn more [here](/apps/extras/environment-variables).

{% tabs %}
{% tab title="Single Variable" %}

<figure><img src="/files/g4PjEAekY8aojSeKi1XF" alt="Image showing the single variable ENV mode on Clouddley" width="563"><figcaption><p>Single variable ENV mode</p></figcaption></figure>
{% endtab %}

{% tab title="Import Variables" %}

<figure><img src="/files/60lrDpuC46Uwr2tcIvfH" alt="Image showing the Import Variables ENV mode on Clouddley." width="563"><figcaption><p>Import variables ENV mode</p></figcaption></figure>
{% endtab %}
{% endtabs %}

* Add the key-value pairs and click on **Save**
* Click on **Next**

<figure><img src="/files/OdpGrkme49HrFjbXFzyW" alt="Image showing environment variables added during app deployment on Clouddley."><figcaption><p>Adding environment variables</p></figcaption></figure>

#### **Step 6: Set up Notifications (optional)**

* To configure the **notification settings** of the application, click on :heavy\_plus\_sign: <mark style="color:blue;">**Add Alert**</mark>
* Select the **Alert type.** For this tutorial, we will set up Email alerts.
* Toggle on the buttons of the deployment event (failed, timed out, or success)  you want to be notified of.
* Enter the **Email address** where you want to receive alerts. (You can add multiple email addresses)
* Click on **Save**
* Click on **Deploy**

<figure><img src="/files/ItAmC6aXlBntUjIxE82E" alt="A gif showing how to set up notifications on Clouddley."><figcaption><p>Notifications set up and creation of Ruby on Rails application on Clouddley</p></figcaption></figure>

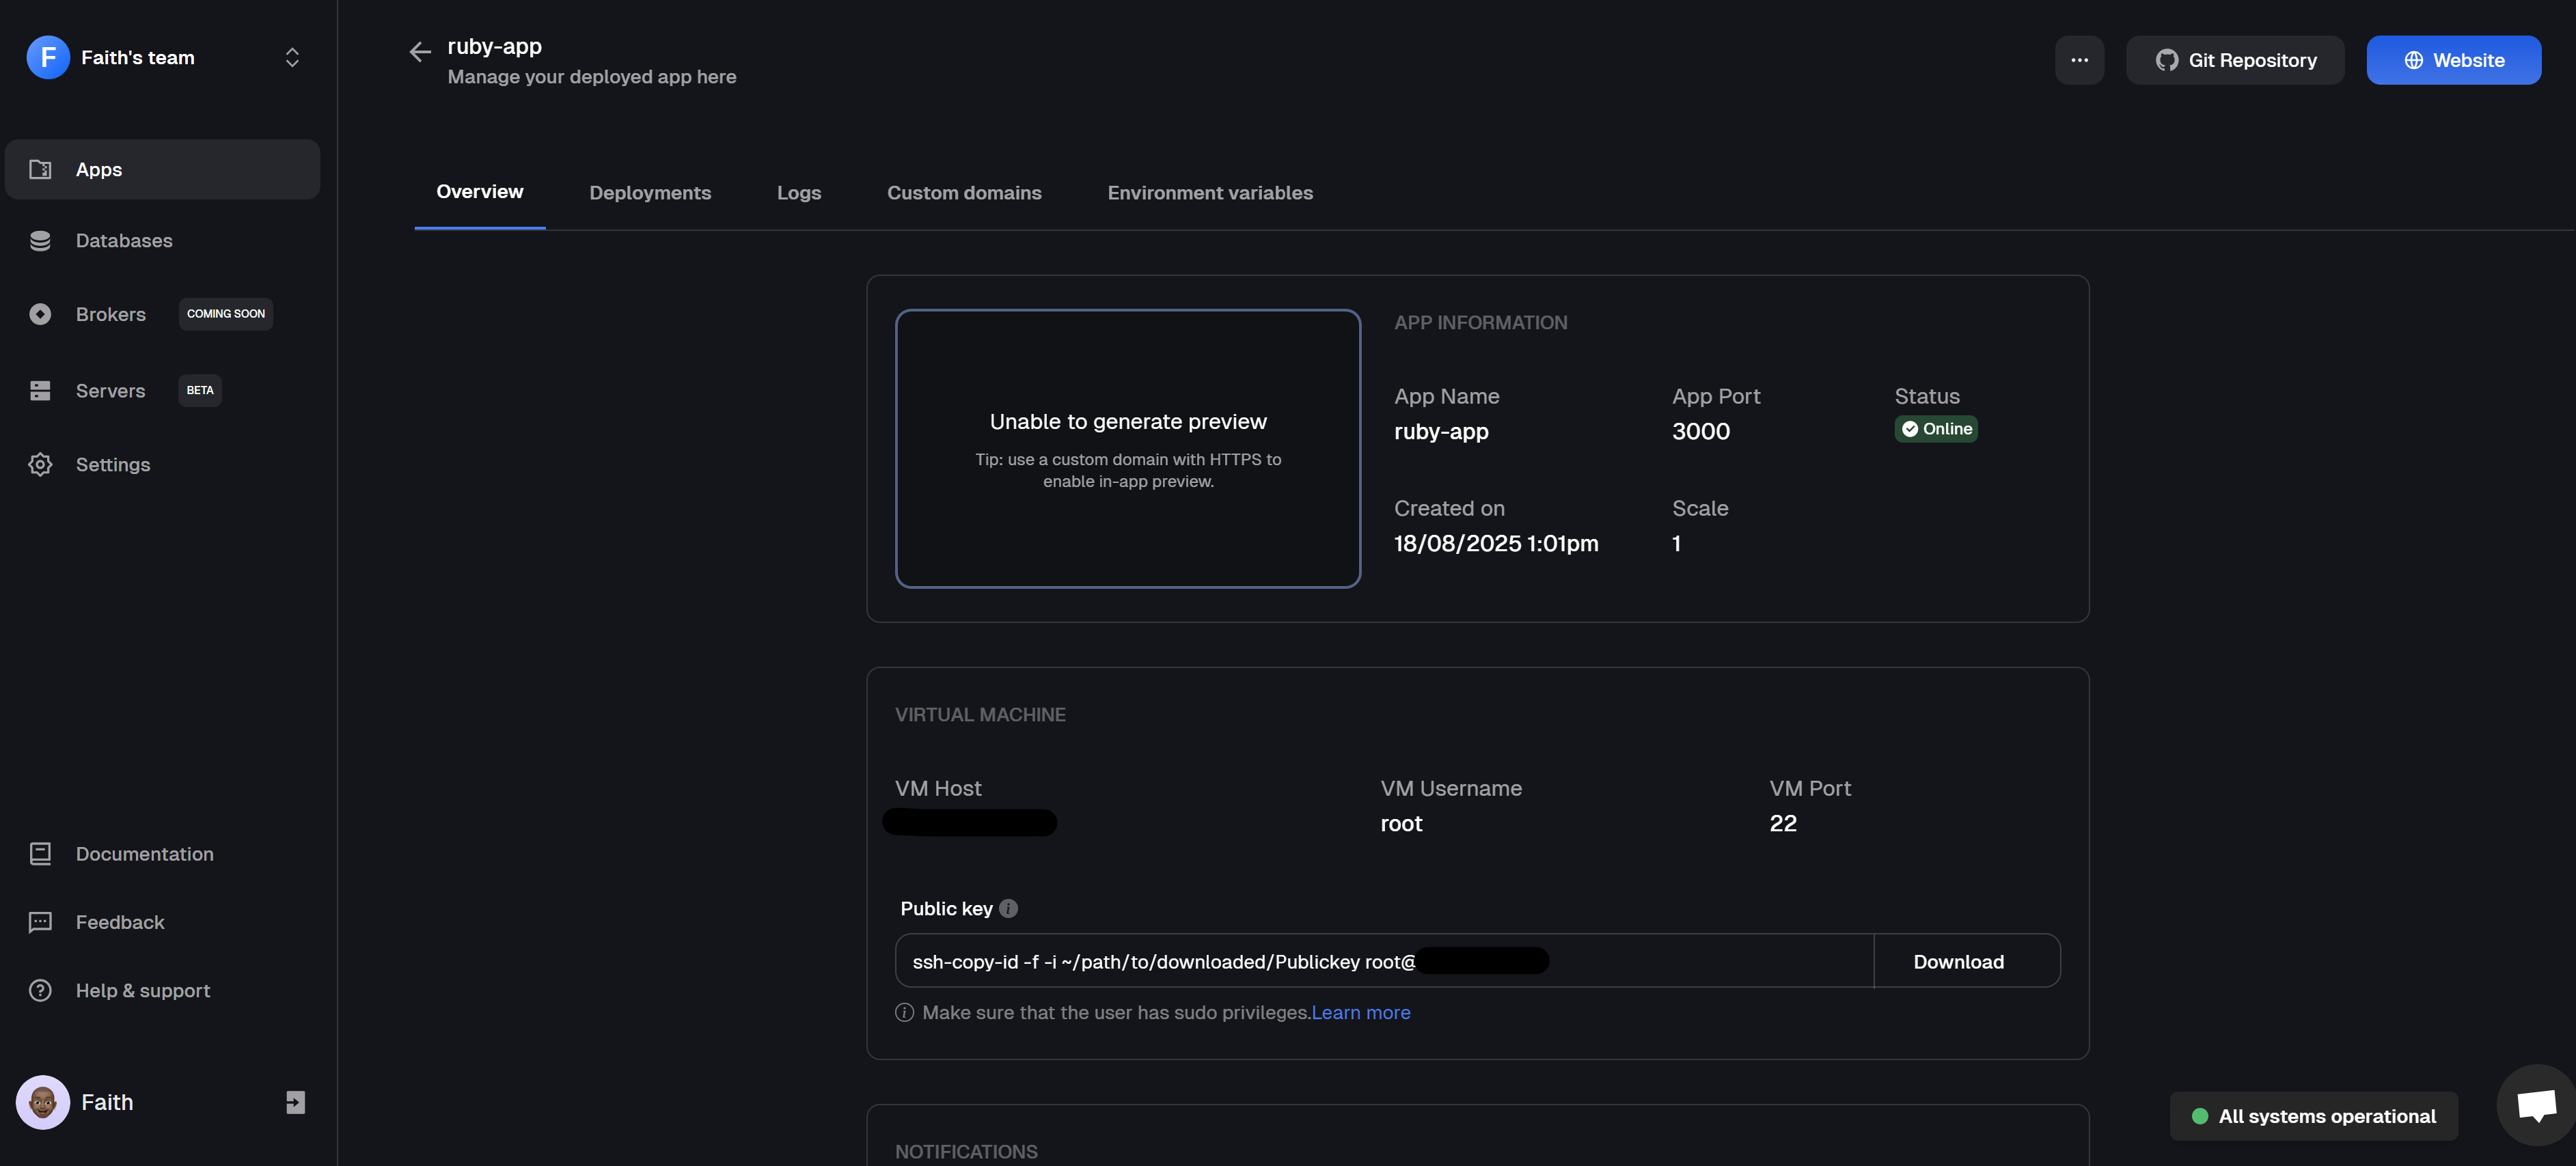
#### **Step 7: Test and Verify the app**

* Click on **Go to Dashboard. Y**our app will be visible on the apps dashboard.
* After the app deployment is complete, the app status changes from `Deploying` to `Online`

<figure><img src="/files/7m41pXgle8Q2HmVY8wZ5" alt="An image of the overview of a successfully deployed Ruby on Rails application on Clouddley."><figcaption><p>Ruby on Rails application dashboard overview</p></figcaption></figure>

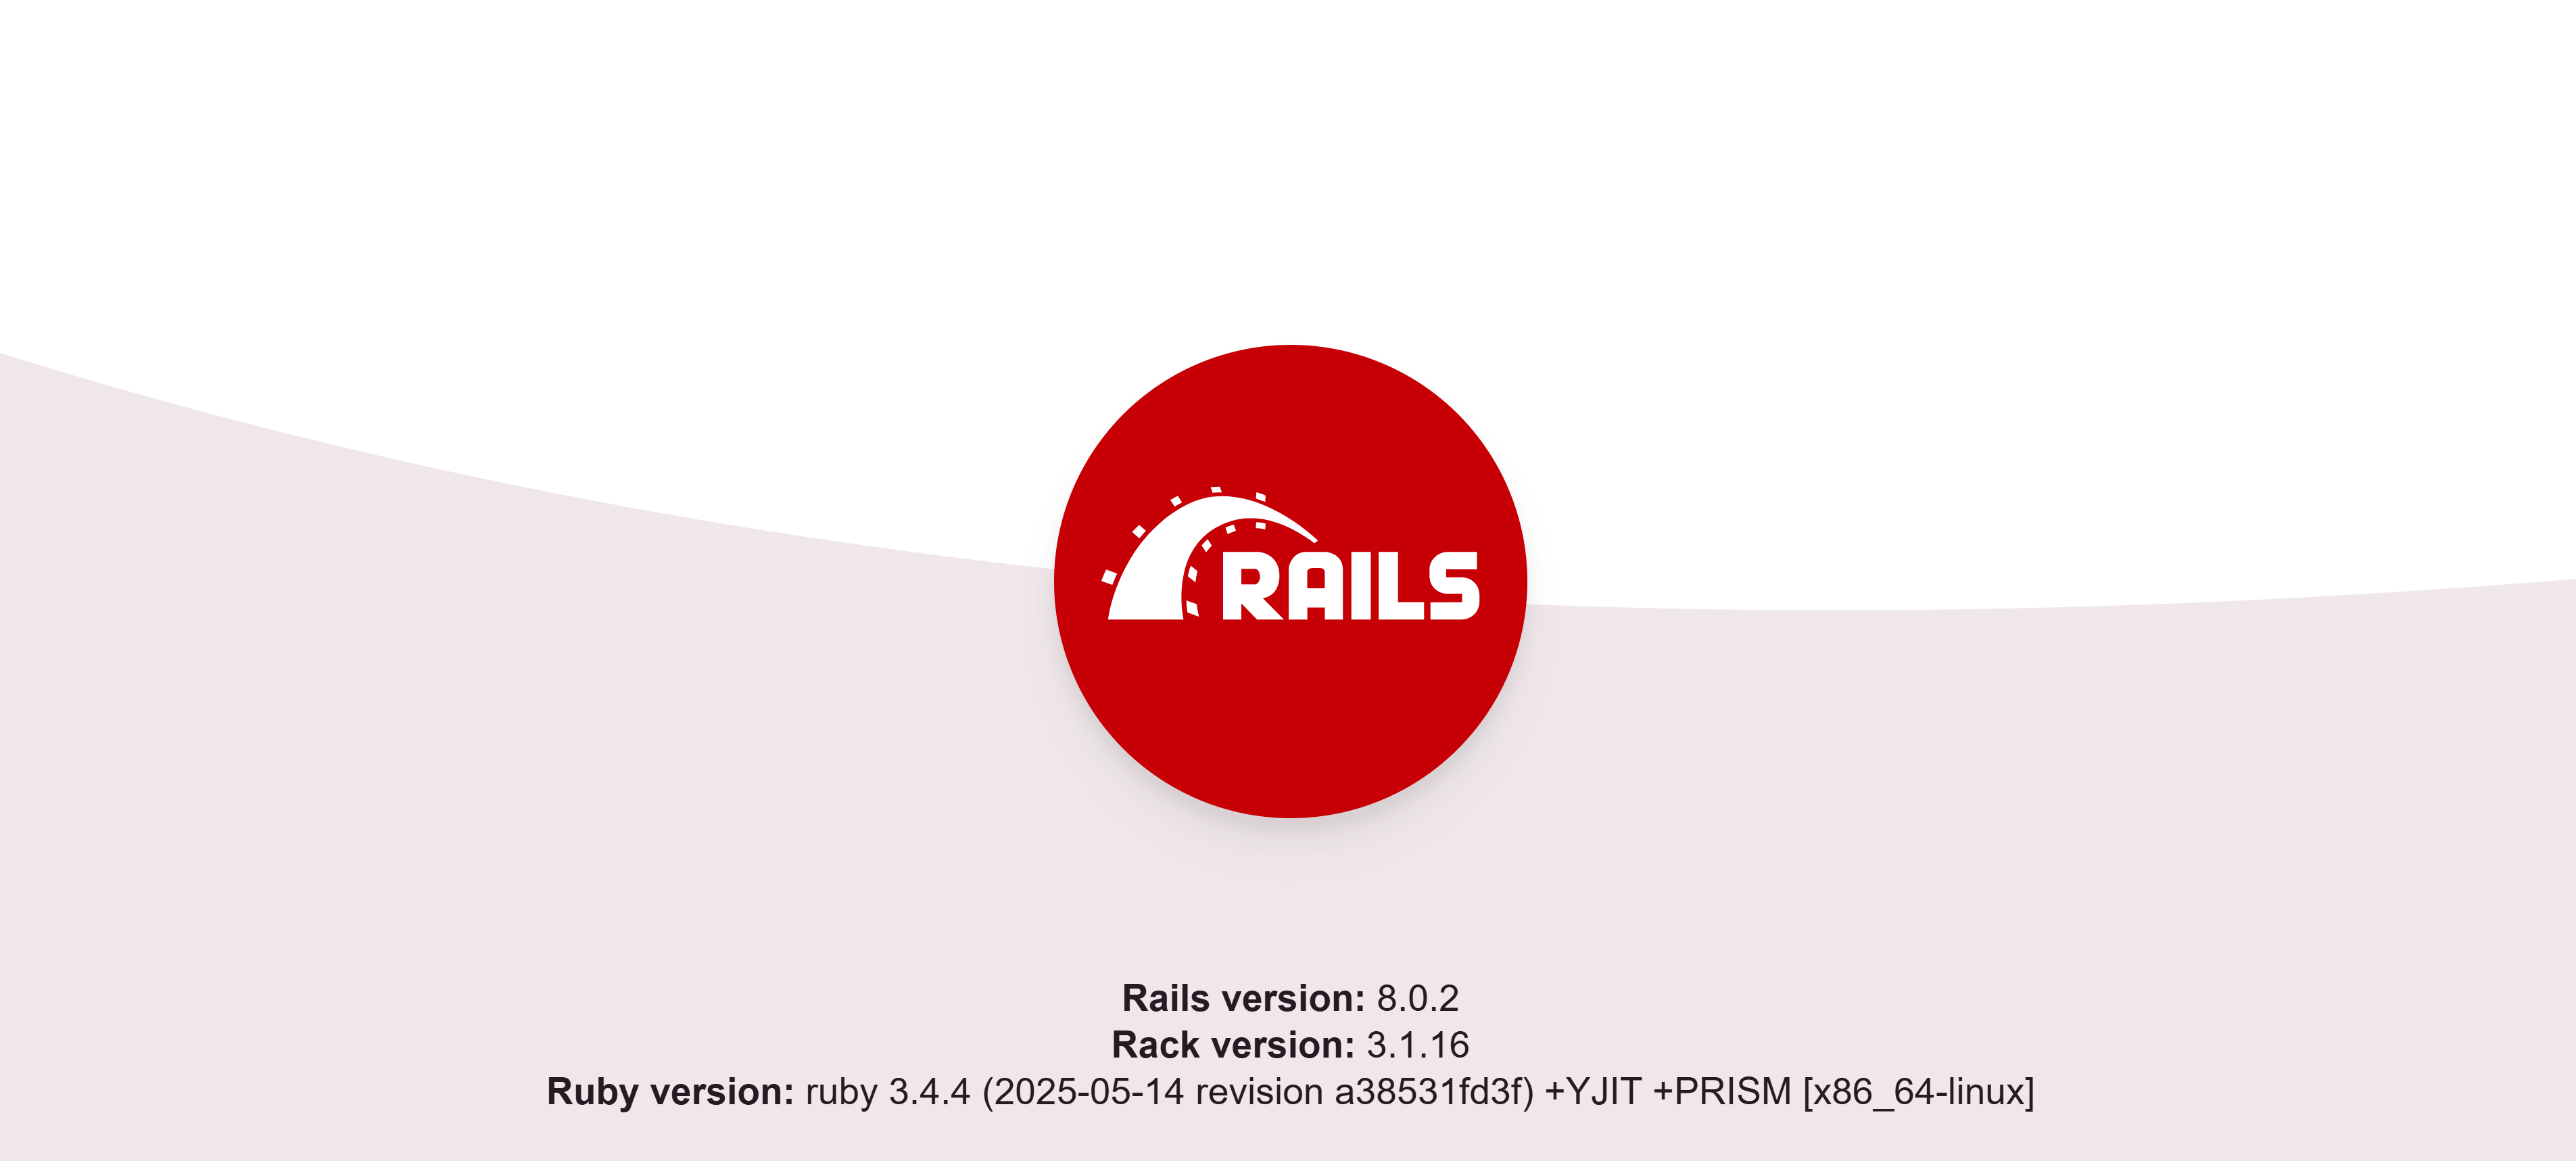
* Click on :globe\_with\_meridians: **Website** at the top right corner of the page, which opens the URL of the deployed application in your browser.
* You can test the application functionalities.

<figure><img src="/files/zkFP1Pw50Y4Bh9sDW4GL" alt="An image of the Ruby on Rails application running on Clouddley on the web."><figcaption><p>Ruby on Rails application running from Clouddley on a cloud virtual machine</p></figcaption></figure>

You have deployed a Ruby on Rails application successfully on Clouddley. You can manage it directly from the app dashboard by clicking the three dots (**...**) at the top-right corner to access **Edit**, **Instant Rollback**, **Scale**, **Pause**, and **Delete** options.

Additionally, you can switch to different tabs on the application dashboard to perform the following actions: view your **deployment** history, view or download **logs**, add a **custom domain**, and view the **environment variables**.

### **Conclusion**

You've successfully deployed a Ruby on Rails application on Clouddley! To access the source code of this application, check [here](https://github.com/clouddley/examples/tree/main/ruby-on-rails). Furthermore, to explore how different frameworks can be deployed on Clouddley, check out our [how-to guides](/apps/how-to-guides).


# Deploy a Flask Application on Clouddley

Learn how to deploy a Flask app on Clouddley.

Clouddley is a powerful backend infrastructure platform that enables you to deploy a Flask application seamlessly, with zero downtime on your server. In this guide, we'll walk you through the [Flask](https://flask.palletsprojects.com/en/2.3.x/) application deployment process, highlighting why Clouddley is your ideal choice for efficient deployments with ease. Let's get started!

### Prerequisites

* A [GitHub](https://github.com/) or [Bitbucket](https://bitbucket.org/product) Account.
* A [Clouddley](https://clouddley.com/) account.
* A [Flask](https://flask.palletsprojects.com/en/2.3.x/) application.
* A virtual machine on a Cloud platform or bare metal server.

### Deploy your Flask Application

**Optimize your codebase for deployment**

To deploy a Flask application on Clouddley, create a `Procfile`  in the root directory of your project. This specifies the command used to run the application.

{% code title="Procfile" %}

```
web: python app.py
```

{% endcode %}

#### **Accessing Apps**

Now, let's move on to deploying the Flask application:

* Open your web browser and sign in to your Clouddley account
* Proceed to [Apps](https://app.clouddley.com/apps) and click on **Deploy app**

<figure><img src="/files/7hiMQsGBbJLWH1hAlqJu" alt="Image of Apps dashboard."><figcaption><p>Accessing Apps</p></figcaption></figure>

#### **Step 1: Configure Service**

* Choose your Git hosting service; either **GitHub** or **Bitbucket**. For this tutorial, we will be using GitHub.
* Click on **Continue with GitHub**

<figure><img src="/files/wGRJv4utI9yHwvgWvVAW" alt="Configuring Git hosting service during app deployment on Apps."><figcaption><p>Choose your Git hosting service</p></figcaption></figure>

#### **Step 2: Configure Git**

* To connect your GitHub user or organization account, click the **Select username/organization** dropdown and **Add GitHub account.**
* Select your **repository** and the **branch** from the dropdown list or quickly search.
* Click on **Next**

<figure><img src="/files/faCh2Fru8KlKWXlPPYOT" alt="Configuring the Git repository during app deployment on Triggr Apps."><figcaption><p>Setup the Flask application repository on Clouddley</p></figcaption></figure>

#### **Step 3: Configure your Virtual Machine**

In the Choose or add server dropdown, select your virtual machine (VM) if it’s already listed. If not, select **+ Add Virtual Machine**.

Enter the following details to configure your VM:

* Hostname or IP address
* Username
* SSH port

After adding the details, use the **Clouddley CLI** (recommended) or connect via **SSH** to verify the connection.

{% tabs %}
{% tab title="Clouddley CLI" %}
The Clouddley CLI is a command-line tool that allows you to interact with the Clouddley Platform from your terminal.

* Open the command line of the remote VM you want to configure to Clouddley and install Clouddley CLI by running the command:

```bash
curl -L https://raw.githubusercontent.com/clouddley/cli/main/install.sh | sh
```

* To add the SSH public key, run the command:

```bash
clouddley add key
```

Using the CLI, you can deploy resources, manage configurations, and automate tasks efficiently.
{% endtab %}

{% tab title="SSH" %}

* Download the public key to your local machine.
* Run the provided command on your local machine, allowing Clouddley to connect to your virtual machine.

```
ssh-copy-id -f -i ~/path/to/downloaded/Publickey username@ipaddress
```

{% hint style="info" %}
Replace `~/path/to/downloaded/Publickey` ,`username` and `ipaddress`  with your actual values.
{% endhint %}
{% endtab %}
{% endtabs %}

* Click on **Verify**. This verifies the connection.
* Click on **Next**

<figure><img src="/files/qtcRfmLeUDV5fe8r7nQk" alt="Configuring the virtual machine during app deployment"><figcaption><p>Configuration of virtual machine on Clouddley</p></figcaption></figure>

#### **Step 4: Configure app settings**

* Insert the **name** of the application and its **port.**
* Click on **Next**

<figure><img src="/files/F0gBcwHrV8wSxbO0Pupc" alt="Configuring App settings (name and port) during app deployment."><figcaption><p>Configure the App name and port</p></figcaption></figure>

{% hint style="info" %}
The firewall of the virtual machine should allow access to the application port.
{% endhint %}

#### **Step 5: Configure Environment Variables**&#x20;

* To add environment variables, click on  :heavy\_plus\_sign: <mark style="color:blue;">**Add Variable**</mark>&#x20;
* Choose an ENV mode: either a **single variable** or **import variables**. Learn more [here](/apps/extras/environment-variables).

{% tabs %}
{% tab title="Single Variable" %}

<figure><img src="/files/g4PjEAekY8aojSeKi1XF" alt="Image showing the single variable ENV mode on Clouddley" width="563"><figcaption><p>Single variable ENV mode</p></figcaption></figure>
{% endtab %}

{% tab title="Import Variables" %}

<figure><img src="/files/60lrDpuC46Uwr2tcIvfH" alt="Image showing the Import Variables ENV mode on Clouddley." width="563"><figcaption><p>Import variables ENV mode</p></figcaption></figure>
{% endtab %}
{% endtabs %}

* Add the key-value pairs and click on **Save**
* Click on **Next**

<figure><img src="/files/ZZPgFvBUxT3C91tdH1Ie" alt="Image showing environment variables added during app deployment on Clouddley."><figcaption><p>Adding environment variables</p></figcaption></figure>

#### **Step 6: Set up Notifications (optional)**

* To configure the **notification settings** of the application, click on :heavy\_plus\_sign: <mark style="color:blue;">**Add Alert**</mark>
* Select the **Alert type.** For this tutorial, we will set up Email alerts.
* Toggle on the buttons of the deployment event (failed, timed out, or success)  you want to be notified of.
* Enter the **Email address** where you want to receive alerts. (You can add multiple email addresses)
* Click on **Save**
* Click on **Deploy**

<figure><img src="/files/ItAmC6aXlBntUjIxE82E" alt="A gif showing how to set up notifications during app deployment on Clouddley.."><figcaption><p>Notifications set up and creation of Flask application on Clouddley</p></figcaption></figure>

#### **Step 7: Test and Verify the app**

* Click on **Go to Dashboard. Y**our app will be visible on the apps dashboard.
* After the app deployment is complete, the app status changes from `Deploying` to `Online`

<figure><img src="/files/o22sidteHBQhDtV1bagb" alt="An image of the overview of a successfully deployed Flask application on Triggr Apps."><figcaption><p>Flask application dashboard overview</p></figcaption></figure>

* Click on :globe\_with\_meridians: **Website** at the top right corner of the page, which opens the URL of the deployed application in your browser.
* You can test the application functionalities.

<figure><img src="/files/n9ACzFPMQvB4RRk2YXlc" alt="An image of the Flask application running on Clouddley on the web."><figcaption><p>Flask application running from Clouddley on a cloud virtual machine</p></figcaption></figure>

You have successfully deployed a Flask application on Clouddley. You can manage it directly from the app dashboard by clicking the three dots (**...**) at the top-right corner to access **Edit**, **Instant Rollback**, **Scale**, **Pause**, and **Delete** options.

Furthermore, you can switch to different tabs on the application dashboard to perform the following actions: view your **deployment** history, view or download **logs**, add a **custom domain**, and view the **environment** **variables**.

### **Conclusion**

Congratulations :tada: on successfully deploying a Flask application on Clouddley. You can access the source code for this application [here](https://github.com/clouddley/examples/tree/main/python/flask). Additionally, you can explore how different frameworks can be deployed on Clouddley in our [how-to guides.](/apps/how-to-guides)


# Deploy a .NET Core Application on Clouddley

Learn how to deploy a .NET Core app on Clouddley.

In this article, our focus will be on deploying a [.NET Core](https://learn.microsoft.com/en-us/aspnet/core/introduction-to-aspnet-core?view=aspnetcore-7.0) application on Clouddley. However, before going into that, it's important to understand Clouddley. Clouddley is a backend infrastructure platform for your compute resources that auto-detects your runtime and deploys your application to your server (virtual machines and bare metal). So, let's get started!

### Prerequisites

* A [GitHub](https://github.com/) or [Bitbucket](https://bitbucket.org/product) Account.
* A [Clouddley](https://clouddley.com/) account.
* A [.NET Core](https://learn.microsoft.com/en-us/aspnet/core/introduction-to-aspnet-core?view=aspnetcore-7.0) application.
* A virtual machine on a Cloud platform or a bare metal server.

### Deploying your .NET Core Application

**Create a Dockerfile**

In the application root directory, create a Dockerfile  `triggr.dockerfile`  that defines how the app should be containerized.

{% hint style="info" %}
**Best Practice:** When creating a Dockerfile, use a lightweight base image to reduce image size. Always specify exact versions for dependencies to ensure consistency.
{% endhint %}

{% code title="triggr.dockerfile" %}

```docker
# Build stage
FROM mcr.microsoft.com/dotnet/sdk:9.0 AS build
WORKDIR /src

# Copy csproj and restore dependencies
COPY *.csproj ./
RUN dotnet restore

# Copy everything else and build
COPY . ./
RUN dotnet publish -c Release -o /app/publish /p:UseAppHost=false

# Runtime stage
FROM mcr.microsoft.com/dotnet/aspnet:9.0 AS final
WORKDIR /app
COPY --from=build /app/publish .

# Set the port to match local dev
EXPOSE 5013

ENTRYPOINT ["dotnet", "newApp.dll"]
```

{% endcode %}

**Building and Running the Container Locally**

Before deploying to **Apps**, verify that the container works locally.

1. **Build the Docker image**:

   ```
   docker build -t new-app -f triggr.dockerfile .
   ```
2. **Run the container**:

   ```
   docker run -d -p 5013:5013 --name new-app-container new-app
   ```
3. **Verify the app is running** by visiting `http://localhost:5013`.

**Accessing Apps**

* Launch your web browser and log in to your Clouddley account.
* Navigate to [Apps](https://app.clouddley.com/apps) and click on **Deploy App**

<figure><img src="/files/7hiMQsGBbJLWH1hAlqJu" alt="Image of Apps dashboard."><figcaption><p>Accessing Apps</p></figcaption></figure>

#### **Step 1: Configure Service**

* Choose your Git hosting service; either **GitHub** or **Bitbucket**. For this tutorial, we will be using GitHub.
* Click on **Continue with GitHub**

<figure><img src="/files/wGRJv4utI9yHwvgWvVAW" alt="Configuring Git hosting service during app deployment on Clouddley."><figcaption><p>Choose your Git hosting service</p></figcaption></figure>

#### **Step 2: Configure Git**

* To connect your GitHub user or organization account, click the **Select username/organization** dropdown and **Add GitHub account.**
* Select your **repository** and the **branch** from the dropdown list or quickly search.
* Click on **Next**

<figure><img src="/files/faCh2Fru8KlKWXlPPYOT" alt="Configuring the Git repository during app deployment on Clouddley."><figcaption><p>Setup the .NET Core application repository on Clouddley</p></figcaption></figure>

#### **Step 3: Configure your Virtual Machine**

In the Choose or add server dropdown, select your virtual machine (VM) if it’s already listed. If not, select **+ Add Virtual Machine**.

Enter the following details to configure your VM:

* Hostname or IP address
* Username
* SSH port

After adding the details, use the **Clouddley CLI** (recommended) or connect via **SSH** to verify the connection.

{% tabs %}
{% tab title="Clouddley CLI" %}
The Clouddley CLI is a command-line tool that allows you to interact with the Clouddley Platform from your terminal.

* Open the command line of the remote VM you want to configure to Clouddley and install Clouddley CLI by running the command:

```bash
curl -L https://raw.githubusercontent.com/clouddley/cli/main/install.sh | sh
```

* To add the SSH public key, run the command:

```bash
clouddley add key
```

Using the CLI, you can deploy resources, manage configurations, and automate tasks efficiently.
{% endtab %}

{% tab title="SSH" %}

* Download the public key to your local machine.
* Run the provided command on your local machine, allowing Clouddley to connect to your virtual machine.

```
ssh-copy-id -f -i ~/path/to/downloaded/Publickey username@ipaddress
```

{% hint style="info" %}
Replace `~/path/to/downloaded/Publickey` ,`username` and `ipaddress`  with your actual values.
{% endhint %}
{% endtab %}
{% endtabs %}

* Click on **Verify**. This verifies the connection.
* Click on **Next**

<figure><img src="/files/qtcRfmLeUDV5fe8r7nQk" alt="Configuring the virtual machine during app deployment on Clouddley."><figcaption><p>Configuration of virtual machine on Clouddley</p></figcaption></figure>

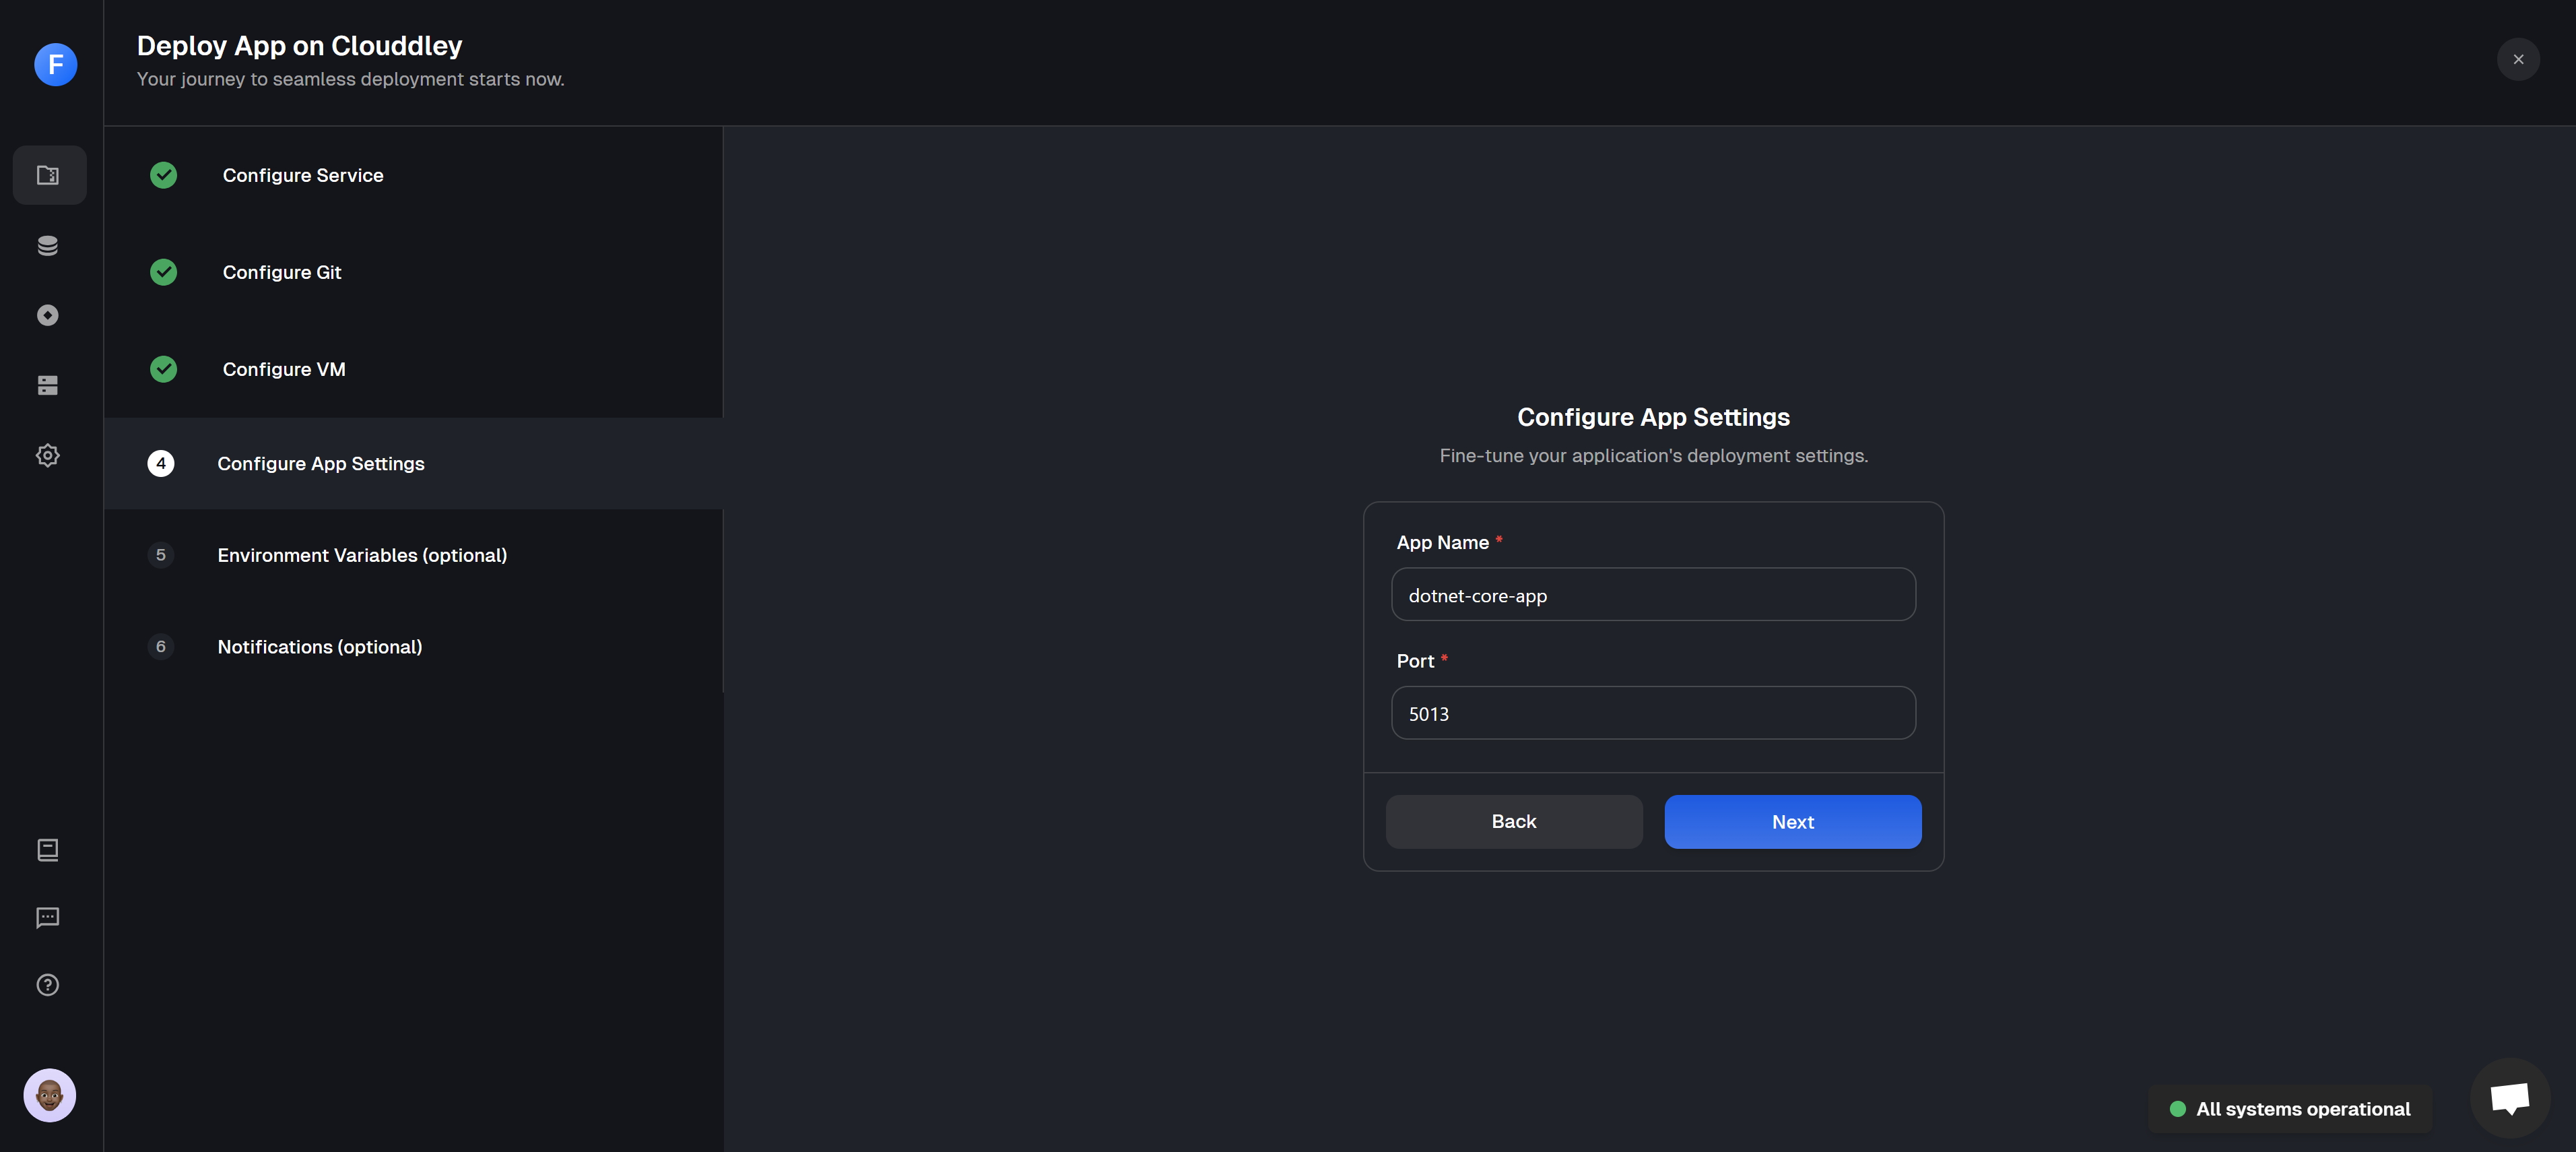
#### **Step 4: Configure app settings**

* Insert the **name** of the application and its **port.**
* Click on **Next**

<figure><img src="/files/LFng5Aj6gwMOuQ1D4sZY" alt="Configuring App settings (name and port) during app deployment on Clouddley."><figcaption><p>Configure the App name and port</p></figcaption></figure>

{% hint style="info" %}
Ensure the virtual machine's firewall permits access to the application port.
{% endhint %}

#### **Step 5: Configure Environment Variables**&#x20;

* To add environment variables, click on  :heavy\_plus\_sign: <mark style="color:blue;">**Add Variable**</mark>&#x20;
* Choose an ENV mode: either a **single variable** or **import variables**. Learn more [here](/apps/extras/environment-variables).

{% tabs %}
{% tab title="Single Variable" %}

<figure><img src="/files/g4PjEAekY8aojSeKi1XF" alt="Image showing the Single Variables ENV mode on Clouddley." width="563"><figcaption><p>Single variable ENV mode</p></figcaption></figure>
{% endtab %}

{% tab title="Import Variables" %}

<figure><img src="/files/60lrDpuC46Uwr2tcIvfH" alt="Image showing the Import Variables ENV mode on Clouddley." width="563"><figcaption><p>Import variables ENV mode</p></figcaption></figure>
{% endtab %}
{% endtabs %}

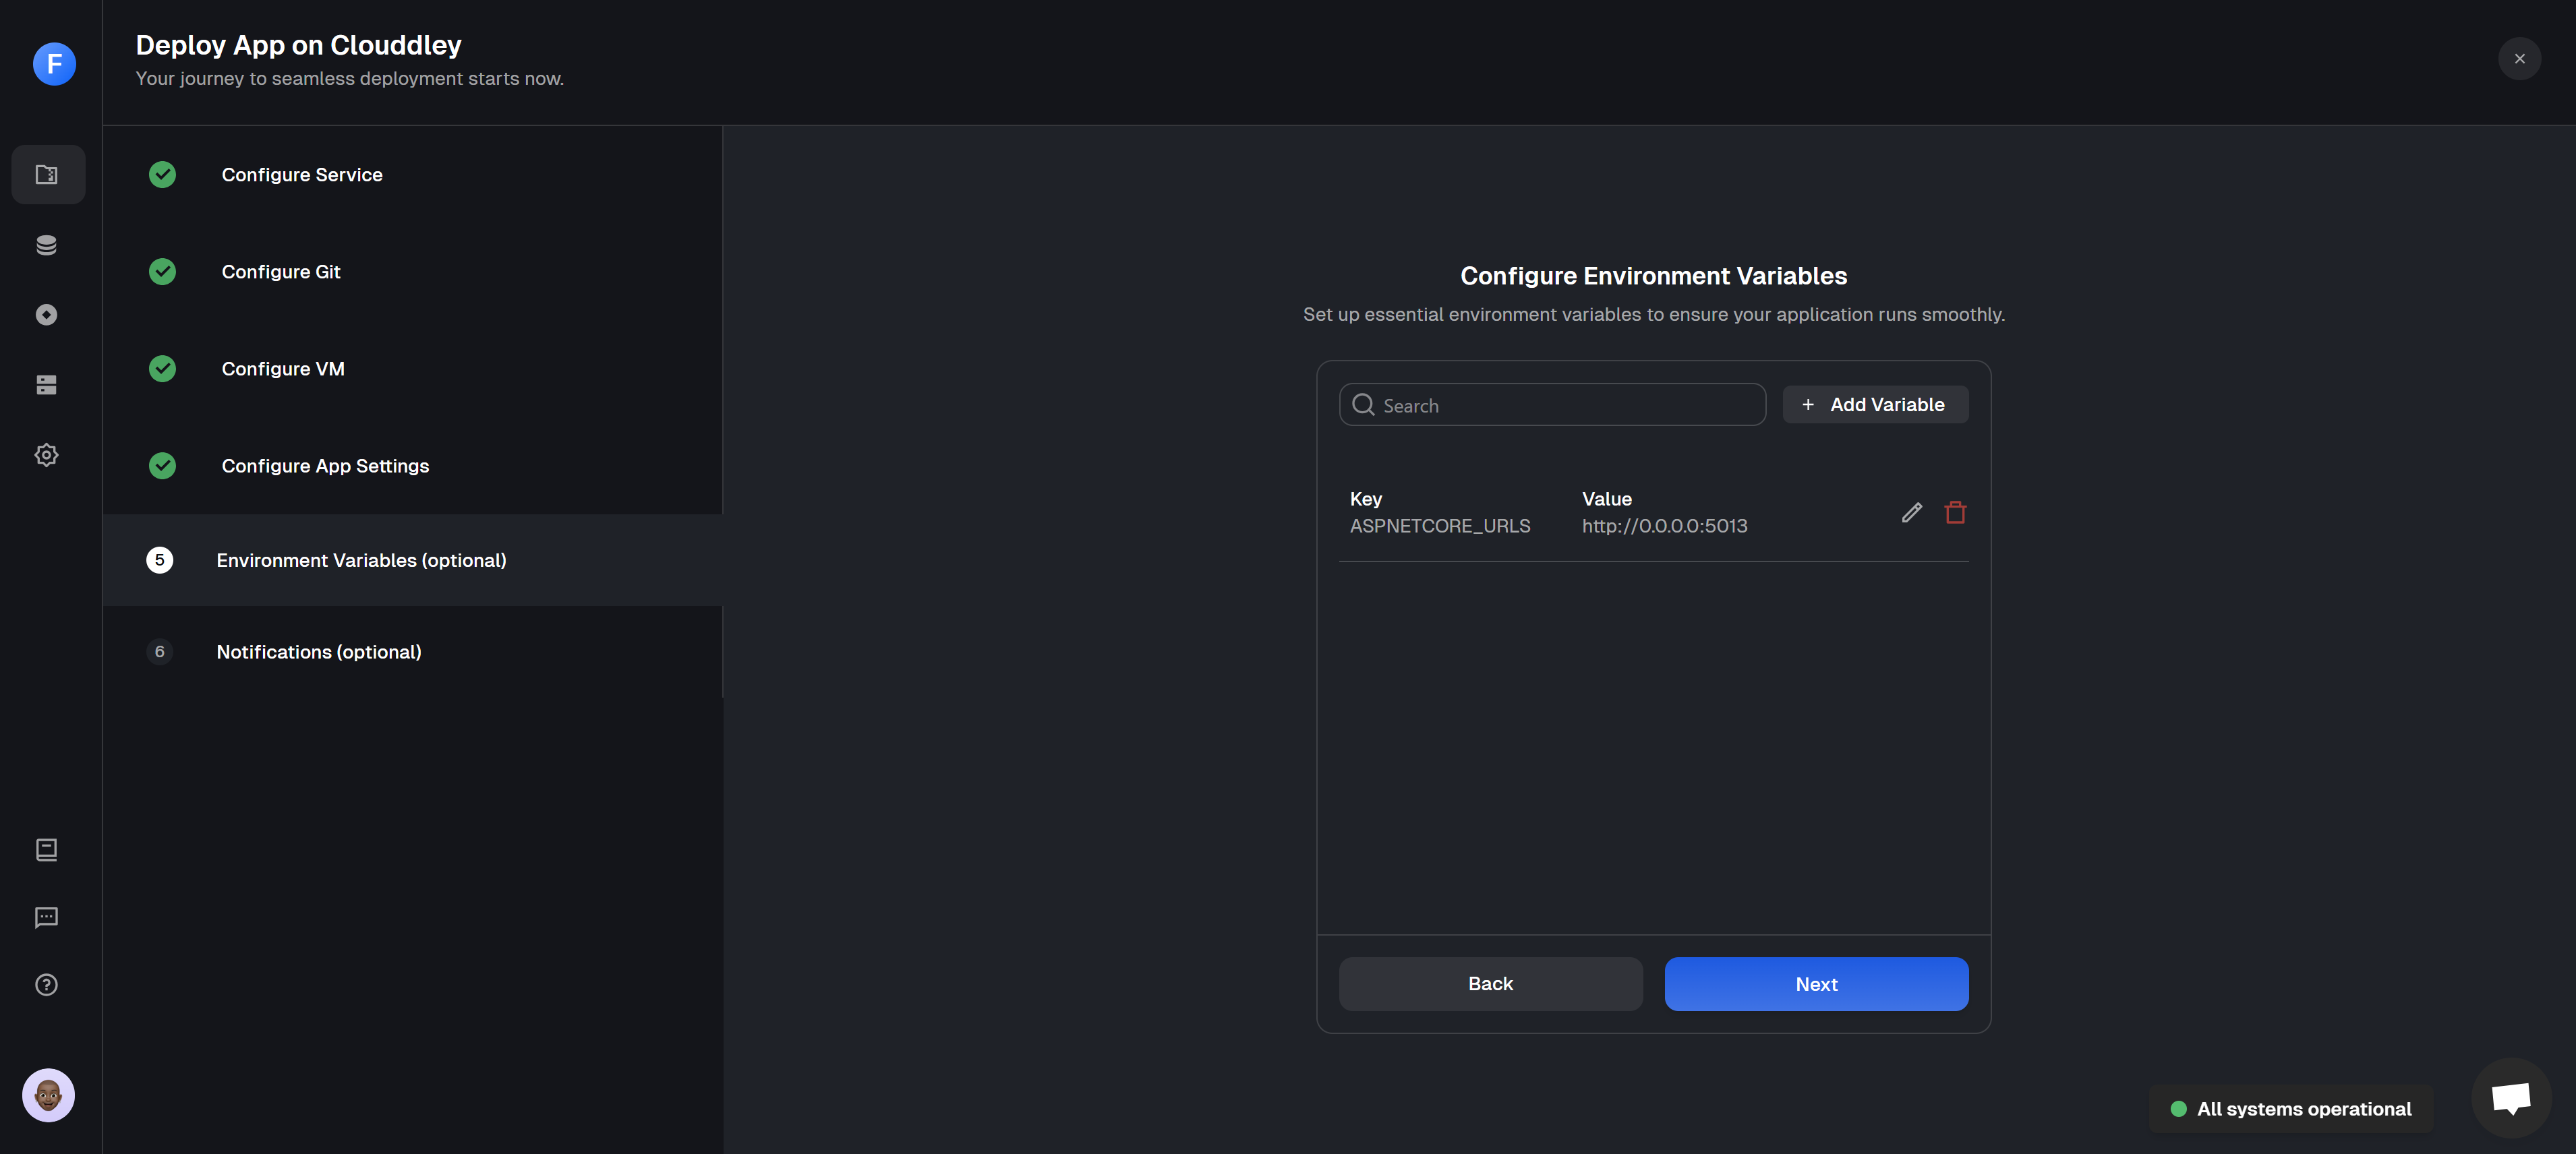
{% hint style="info" %}
To deploy your .NET Core application on Clouddley, you need to set the URL for the application as an environment variable, which can either be `DOTNET_URLS`  or  `ASPNETCORE_URLS`. Since this is an ASP.NET Core application, we will set;

{% code fullWidth="false" %}

```bash
key: ASPNETCORE_URLS
value: http://0.0.0.0:5013
```

{% endcode %}
{% endhint %}

* Add the key-value pairs and click on **Save**
* Click on **Next**

<figure><img src="/files/EIkWHCaGN384fKdYKyYU" alt="Image showing environment variables added during app deployment on Clouddley."><figcaption><p>Adding environment variables</p></figcaption></figure>

#### **Step 6: Set up Notifications (optional)**

* To configure the **notification settings** of the application, click on :heavy\_plus\_sign: <mark style="color:blue;">**Add Alert**</mark>
* Select the **Alert type.** For this tutorial, we will set up Email alerts.
* Toggle on the buttons of the deployment event (failed, timed out, or success)  you want to be notified of.
* Enter the **Email address** where you want to receive alerts. (You can add multiple email addresses)
* Click on **Save**
* Click on **Deploy**

<figure><img src="/files/ItAmC6aXlBntUjIxE82E" alt="A gif showing how to set up notifications on Clouddley."><figcaption><p>Notifications set up and creation of .NET Core  application on Clouddley</p></figcaption></figure>

#### **Step 7: Test and Verify the app**

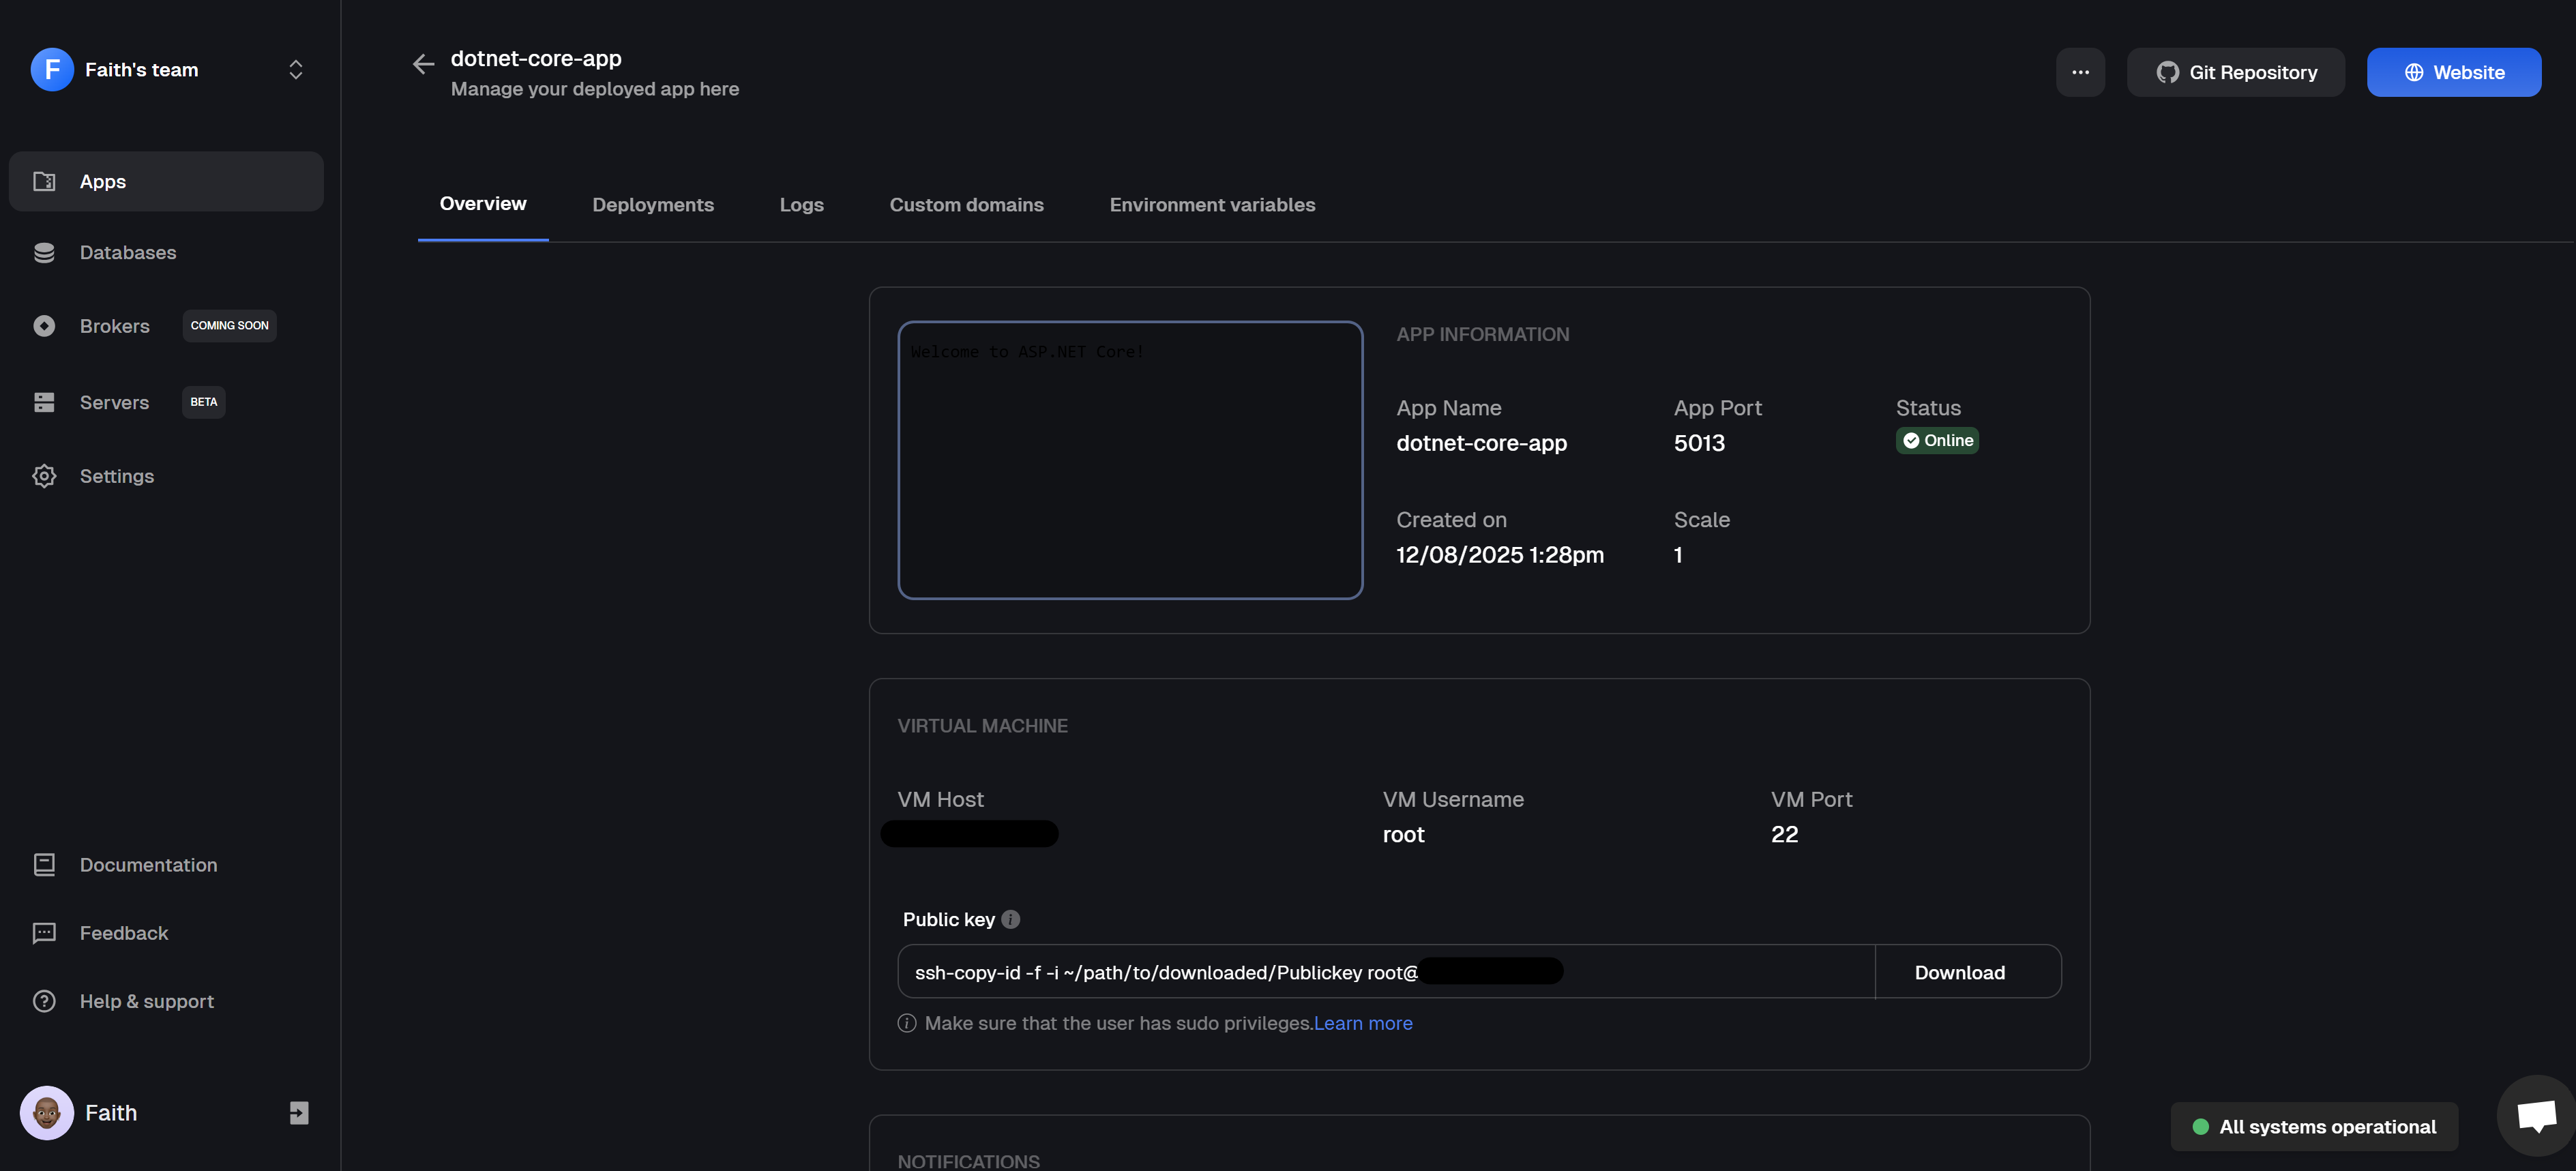
* Click on **Go to Dashboard.** Your app will be visible on the apps dashboard.
* After the app deployment is complete, the app status changes from `Deploying` to `Online`

<figure><img src="/files/KtKw2JWqDz8ZQuTmY518" alt="An image of the overview of a successfully deployed Dotnet application on Clouddley."><figcaption><p>.NET Core application dashboard overview</p></figcaption></figure>

* Click on :globe\_with\_meridians: **Website** at the top right corner of the page, which opens the URL of the deployed application in your browser.
* You can test the application functionalities.

<figure><img src="/files/jIEalJD5NJADz7z6XJWy" alt="An image of the Dotnet application running from Clouddley on the web."><figcaption><p>.NET Core application running from Clouddley on a cloud virtual machine</p></figcaption></figure>

You have deployed a .NET Core application successfully on Clouddley. You can manage it directly from the app dashboard by clicking the three dots (**...**) at the top-right corner to access **Edit**, **Instant Rollback**, **Scale**, **Pause**, and **Delete** options.

Additionally, you can switch to different tabs on the application dashboard to perform the following actions: view your **deployment** history, view or download **logs**, add a **custom domain**, and view the **environment variables**.

### Conclusion

Congratulations :tada: on successfully deploying a .NET Core application on Clouddley!. Feel free to explore the source code for this application [here](https://github.com/clouddley/examples/tree/main/dotnet-core). Furthermore, you can explore our [how-to guides ](/apps/how-to-guides)to discover how various frameworks can be deployed on Clouddley.


# Deploy a FastAPI App on Clouddley

Learn how to deploy a FastAPI app on Clouddley.

In this article, we'll learn how to deploy a [FastAPI ](https://fastapi.tiangolo.com/)application on Clouddley. Before that, What is Clouddley? Clouddley is a backend infrastructure platform for your compute resources that auto-detects your runtime and deploys your application to your server (virtual machines and bare metal). Let’s begin!

### Prerequisites

* A [GitHub](https://github.com/) or [Bitbucket](https://bitbucket.org/product) Account.
* A [Clouddley](https://clouddley.com/) account.
* A [FastAPI](https://fastapi.tiangolo.com/) application.
* A virtual machine on a Cloud platform or a bare metal server.

### Deploy your FastAPI Application

**Optimize your codebase for deployment**

To deploy a FastAPI application on Clouddley, you need to create a `Procfile` in the root directory of your project. This specifies the command used to run the application.&#x20;

{% code title="Procfile" %}

```
web: python main.py
```

{% endcode %}

#### **Accessing Apps**

* Open your web browser, log in to your Clouddley account
* Navigate to [Apps](https://app.clouddley.com/apps) and click on **Deploy App**

<figure><img src="/files/7hiMQsGBbJLWH1hAlqJu" alt="Image of Apps dashboard."><figcaption><p>Accessing Apps</p></figcaption></figure>

#### **Step 1: Configure Service**

* Choose your Git hosting service; either **GitHub** or **Bitbucket**. For this tutorial, we will be using GitHub.
* Click on **Continue with GitHub**

<figure><img src="/files/wGRJv4utI9yHwvgWvVAW" alt="Configuring Git hosting service during app deployment on Clouddley."><figcaption><p>Choose your Git hosting service</p></figcaption></figure>

#### **Step 2: Configure Git**

* To connect your GitHub user or organization account, click the **Select username/organization** dropdown and **Add GitHub account.**
* Select your **repository** and the **branch** from the dropdown list or quickly search.
* Click on **Next**

<figure><img src="/files/faCh2Fru8KlKWXlPPYOT" alt="Configuring the Git repository during app deployment on Clouddley."><figcaption><p>Setup the FastAPI application repository on Clouddley</p></figcaption></figure>

#### **Step 3: Configure your Virtual Machine**

In the Choose or add server dropdown, select your virtual machine (VM) if it’s already listed. If not, select **+ Add Virtual Machine**.

Enter the following details to configure your VM:

* Hostname or IP address
* Username
* SSH port

After adding the details, use the **Clouddley CLI** (recommended) or connect via **SSH** to verify the connection.

{% tabs %}
{% tab title="Clouddley CLI" %}
The Clouddley CLI is a command-line tool that allows you to interact with the Clouddley Platform from your terminal.

* Open the command line of the remote VM you want to configure to Clouddley and install Clouddley CLI by running the command:

```bash
curl -L https://raw.githubusercontent.com/clouddley/cli/main/install.sh | sh
```

* To add the SSH public key, run the command:

```bash
clouddley add key
```

Using the CLI, you can deploy resources, manage configurations, and automate tasks efficiently.
{% endtab %}

{% tab title="SSH" %}

* Download the public key to your local machine.
* Run the provided command on your local machine, allowing Clouddley to connect to your virtual machine.

```
ssh-copy-id -f -i ~/path/to/downloaded/Publickey username@ipaddress
```

{% hint style="info" %}
Replace `~/path/to/downloaded/Publickey` ,`username` and `ipaddress`  with your actual values.
{% endhint %}
{% endtab %}
{% endtabs %}

* Click on **Verify**. This verifies the connection
* Click on **Next**

<figure><img src="/files/qtcRfmLeUDV5fe8r7nQk" alt="Configuring the virtual machine during app deployment on Clouddley."><figcaption><p>Configuration of virtual machine on Clouddley</p></figcaption></figure>

#### **Step 4: Configure app settings**

* Insert the **name** of the application and its **port.**
* Click on **Next**

<figure><img src="/files/dwc5uiX3fVWApbkJjNKB" alt="Configuring App settings (name and port) during app deployment on Clouddley.."><figcaption><p>Configure the App name and port</p></figcaption></figure>

{% hint style="info" %}
The firewall of the virtual machine should allow access to the application port.
{% endhint %}

#### **Step 5: Configure Environment Variables**&#x20;

* To add environment variables, click on  :heavy\_plus\_sign: <mark style="color:blue;">**Add Variable**</mark>&#x20;
* Choose an ENV mode: either a **single variable** or **import variables**. Learn more [here](/apps/extras/environment-variables).

{% tabs %}
{% tab title="Single Variable" %}

<figure><img src="/files/g4PjEAekY8aojSeKi1XF" alt="Image showing the single variable ENV mode on Clouddley" width="563"><figcaption><p>Single variable ENV mode</p></figcaption></figure>
{% endtab %}

{% tab title="Import Variables" %}

<figure><img src="/files/60lrDpuC46Uwr2tcIvfH" alt="Image showing the Import Variables ENV mode on Clouddley" width="563"><figcaption><p>Import variables ENV mode</p></figcaption></figure>
{% endtab %}
{% endtabs %}

* Add the key-value pairs and click on **Save**
* Click on **NEXT**

<figure><img src="/files/BHCTG3pFH45TTnSXenVd" alt="Image showing environment variables added during app deployment on Clouddley."><figcaption><p>Adding environment variables</p></figcaption></figure>

#### **Step 6: Set up Notifications (optional)**

* To configure the **notification settings** of the application, click on :heavy\_plus\_sign: <mark style="color:blue;">**Add Alert**</mark>
* Select the **Alert type.** For this tutorial, we will set up Email alerts.
* Toggle on the buttons of the deployment event (failed, timed out, or success)  you want to be notified of.
* Enter the **Email address** where you want to receive alerts. (You can add multiple email addresses)
* Click on **Save**
* Click on **Deploy**

<figure><img src="/files/ItAmC6aXlBntUjIxE82E" alt="A gif showing how to set up notifications during app deployment on Clouddley."><figcaption><p>Notifications set up and creation of FastAPI application on Clouddley</p></figcaption></figure>

#### **Step 7: Test and Verify the app**

* Click on **Go to Dashboard.** Your app will be visible on the apps dashboard.
* After the app deployment is complete, the app status changes from `Deploying` to `Online`

<figure><img src="/files/wVEpezHItKufYyAwbRQ6" alt="An image of the overview of a successfully deployed FastAPI application on Clouddley."><figcaption><p>FastAPI application dashboard overview</p></figcaption></figure>

* Click on :globe\_with\_meridians: **Website** at the top right corner of the page, which opens the URL of the deployed application in your browser.
* You can test the application functionalities.

<figure><img src="/files/i5UhZRbJjzuLiFeLkXx1" alt="An image of the FastAPI application running on Clouddley on the web."><figcaption><p>FastAPI application running from Clouddley on a cloud virtual machine</p></figcaption></figure>

You have successfully deployed a FastAPI application on Clouddley. You can manage it directly from the app dashboard by clicking the three dots (**...**) at the top-right corner to access **Edit**, **Instant Rollback**, **Scale**, **Pause**, and **Delete** options.

Furthermore, you can switch to different tabs on the application dashboard to perform the following actions: view your **deployment** history, view or download **logs**, add a **custom domain**, and view the **environment** **variables**.

### Conclusion

Congratulations:tada: on successfully deploying a FastAPI application on Clouddley. You can find the application source code [here](https://github.com/clouddley/examples/tree/main/python/fastapi). You can also check out how different frameworks can be deployed on Clouddley in our [how-to guides](/apps/how-to-guides).


# Deploy a NestJS App on Clouddley

Learn how to deploy a NestJS app on Clouddley.

In this article, we'll learn how to deploy a [NestJs](https://nestjs.com/) application on Clouddley. Before that, let’s talk about what Clouddley is. Clouddley is a backend infrastructure platform for your compute resources that auto-detects your runtime and deploys your application to your server, virtual machines, and bare metal. Let's begin!

### Prerequisites

* A [GitHub](https://github.com/) or [Bitbucket](https://bitbucket.org/product) Account.
* A [Clouddley](https://clouddley.com/) account.
* A [Nestjs](https://nestjs.com/) application.
* A virtual machine on a Cloud platform or a bare metal server.

### Deploy your NestJS Application

**Optimize your codebase for deployment**

* For your application to deploy successfully on Clouddley, you need to create a `Procfile` in the root folder of your project with the following contents:

{% hint style="info" %}
This differs depending on which package manager you used for your app creation.
{% endhint %}

{% tabs %}
{% tab title="NPM" %}
web: npm run start:prod
{% endtab %}

{% tab title="YARN" %}
web: yarn start:prod
{% endtab %}

{% tab title="PNPM" %}
web: pnpm run start:prod
{% endtab %}
{% endtabs %}

#### **Accessing Apps**

* Open your web browser, log in to your Clouddley account
* Navigate to [Apps](https://app.clouddley.com/apps) and click on **Deploy App**

<figure><img src="/files/7hiMQsGBbJLWH1hAlqJu" alt="Image of Apps dashboard."><figcaption><p>Accessing Apps</p></figcaption></figure>

#### **Step 1: Configure Service**

* Choose your Git hosting service; either **GitHub** or **Bitbucket**. For this tutorial, we will be using GitHub.
* Click on **Continue with GitHub**

<figure><img src="/files/wGRJv4utI9yHwvgWvVAW" alt="Configuring Git hosting service during app deployment on Clouddley."><figcaption><p>Choose your Git hosting service</p></figcaption></figure>

#### **Step 2: Configure Git**

* To connect your GitHub user or organization account, click the **Select username/organization** dropdown and **Add GitHub account.**
* Select your **repository** and the **branch** from the dropdown list or quickly search.
* Click on **NEXT**

<figure><img src="/files/faCh2Fru8KlKWXlPPYOT" alt="Configuring the Git repository during app deployment on Clouddley."><figcaption><p>Setup the NestJS application repository on Clouddley</p></figcaption></figure>

#### **Step 3: Configure your Virtual Machine**

In the Choose or add server dropdown, select your virtual machine (VM) if it’s already listed. If not, select **+ Add Virtual Machine**.

Enter the following details to configure your VM:

* Hostname or IP address
* Username
* SSH port

After adding the details, use the **Clouddley CLI** (recommended) or connect via **SSH** to verify the connection.

{% tabs %}
{% tab title="Clouddley CLI" %}
The Clouddley CLI is a command-line tool that allows you to interact with the Clouddley Platform from your terminal.

* Open the command line of the remote VM you want to configure to Clouddley and install Clouddley CLI by running the command:

```bash
curl -L https://raw.githubusercontent.com/clouddley/cli/main/install.sh | sh
```

* To install Triggr, run the command:

```bash
clouddley add key
```

Using the CLI, you can deploy resources, manage configurations, and automate tasks efficiently.
{% endtab %}

{% tab title="SSH" %}

* Download the public key to your local machine.
* Run the provided command on your local machine, allowing Clouddley to connect to your virtual machine.

```
ssh-copy-id -f -i ~/path/to/downloaded/Publickey username@ipaddress
```

{% hint style="info" %}
Replace `~/path/to/downloaded/Publickey` ,`username` and `ipaddress`  with your actual values.
{% endhint %}
{% endtab %}
{% endtabs %}

* Click on **Verify**. This verifies the connection
* Click on **Next**

<figure><img src="/files/qtcRfmLeUDV5fe8r7nQk" alt="Configuring the virtual machine during app deployment on Clouddley."><figcaption><p>Configuration of virtual machine on Clouddley</p></figcaption></figure>

#### **Step 4: Configure app settings**

* Insert the **name** of the application and its **port.**
* Click on **Next**

<figure><img src="/files/7yrubMgv0eGaKxBgJAbX" alt="Configuring App settings (name and port) during app deployment on Clouddley."><figcaption><p>Configure the App name and port</p></figcaption></figure>

{% hint style="info" %}
The firewall of the virtual machine should allow access to the application port.
{% endhint %}

#### **Step 5: Configure Environment Variables**&#x20;

* To add environment variables, click on  :heavy\_plus\_sign: <mark style="color:blue;">**Add Variable**</mark>&#x20;
* Choose an ENV mode: either a **single variable** or **import variables**. Learn more [here](/apps/extras/environment-variables).

{% tabs %}
{% tab title="Single Variable" %}

<figure><img src="/files/g4PjEAekY8aojSeKi1XF" alt="Image showing the single variable ENV mode on Clouddley" width="563"><figcaption><p>Single variable ENV mode</p></figcaption></figure>
{% endtab %}

{% tab title="Import Variables" %}

<figure><img src="/files/60lrDpuC46Uwr2tcIvfH" alt="Image showing the Import Variables ENV mode on Clouddley." width="563"><figcaption><p>Import variables ENV mode</p></figcaption></figure>
{% endtab %}
{% endtabs %}

* Add the key-value pairs, and click on **Save.**
* Click on **Next**

<figure><img src="/files/5vR3y3dTMNvW4aFOIUOt" alt="Image showing environment variables added during app deployment on Clouddley."><figcaption><p>Adding environment variables</p></figcaption></figure>

#### **Step 6: Set up Notifications (optional)**

* To configure the **notification settings** of the application, click on :heavy\_plus\_sign: <mark style="color:blue;">**Add Alert**</mark>
* Select the **Alert type.** For this tutorial, we will set up Email alerts.
* Toggle on the buttons of the deployment event (failed, timed out, or success)  you want to be notified of.
* Enter the **Email address** where you want to receive alerts. (You can add multiple email addresses)
* Click on **Save**
* Click on **Deploy**

<figure><img src="/files/ItAmC6aXlBntUjIxE82E" alt="A gif showing how to set up notifications during app deployment on Clouddley."><figcaption><p>Notifications set up and creation of NestJs application on Clouddley</p></figcaption></figure>

#### **Step 7: Test and Verify the app**

* Click on **Go to Dashboard. Y**our app will be visible on the apps dashboard.
* After the app deployment is complete, the app status changes from `Deploying` to `Online`

<figure><img src="/files/UMDrc8XewPbVDYHjqQBB" alt="An image of the overview of a successfully deployed NestJS application on Clouddley."><figcaption><p>NestJS application dashboard overview</p></figcaption></figure>

* Click on :globe\_with\_meridians: **Website** at the top right corner of the page, which opens the URL of the deployed application in your browser.
* You can test the application functionalities.

<figure><img src="/files/oaOfFf9fJQUy4r6tQMrc" alt="An image of the NestJS application running from Clouddley on the web."><figcaption><p>NestJS application running from Clouddley on a cloud virtual machine</p></figcaption></figure>

You have successfully deployed a NestJS application on Clouddley. You can manage it directly from the app dashboard by clicking the three dots (**...**) at the top-right corner to access **Edit**, **Instant Rollback**, **Scale**, **Pause**, and **Delete** options.

Furthermore, you can switch to different tabs on the application dashboard to perform the following actions: view your **deployment** history, view or download **logs**, add a **custom domain**, and view the **environment** **variables**.

### Conclusion

Congratulations:tada: on successfully deploying a NestJS application on Clouddley. You can find the application source code [here](https://github.com/clouddley/examples/tree/main/nodejs/nestjs). You can also check out how different frameworks can be deployed on Clouddley in our [how-to guides](/apps/how-to-guides).


# Deploy a Go Application on Clouddley

Learn how to deploy a Go app on Clouddley.

This article will walk you through the process of deploying a [Go](https://go.dev/doc/) application to a server using Clouddley,  a backend infrastructure platform for your compute resources that auto-detects your runtime and deploys your application to your server (virtual machines and bare metal). Let’s dive in!

### Prerequisites

* A [GitHub](https://github.com/) or [Bitbucket](https://bitbucket.org/product) Account.
* A [Clouddley](https://app.clouddley.com/auth/signup) account.
* A [Go](https://go.dev/doc/) application.
* A virtual machine on a Cloud platform or bare metal server.

### Deploy your Go Application&#x20;

**Optimize your codebase for deployment**

Based on Clouddley's design, deploying a Go application differs for API and full-stack development. We will be showing these two use cases below.

{% tabs %}
{% tab title="Go Full-Stack" %}
To deploy a full-stack Go application on Clouddley, you need to create a [Toml](https://docs.fileformat.com/programming/toml/#what-is-a-toml-file) file `project.toml` in the root directory of your project.

{% code title="project.toml" %}

```toml
[[build.env]]
name="BP_KEEP_FILES"
value="static/*"
```

{% endcode %}

The `value` should specify the folder containing all the files without the `.go` extension for Clouddley to include them during the build process. For this application, the files can be found in a folder named `static`

You can check out the code for this application [here](https://github.com/clouddley/examples/tree/main/go/go-fullstack).
{% endtab %}

{% tab title="Go API" %}
For this use case, we deployed a simple Go API

You can check out the code for this application[ here](https://github.com/clouddley/examples/tree/main/go/go-api).
{% endtab %}
{% endtabs %}

#### **Accessing Apps**

* Open your web browser, log in to your Clouddley account
* Navigate to [Apps ](https://app.clouddley.com/apps)and click on **Deploy** **App**

<figure><img src="/files/7hiMQsGBbJLWH1hAlqJu" alt="Image of Apps dashboard on Clouddley."><figcaption><p>Accessing Apps</p></figcaption></figure>

#### **Step 1: Configure Service**

* Choose your Git hosting service; either **GitHub** or **Bitbucket**. For this tutorial, we will be using GitHub.
* Click on **Continue with GitHub**

<figure><img src="/files/wGRJv4utI9yHwvgWvVAW" alt="Configuring Git hosting service during app deployment on Clouddley."><figcaption><p>Choose your Git hosting service</p></figcaption></figure>

#### **Step 2: Configure Git**

* To connect your GitHub user or organization account, click the **Select username/organization** dropdown and **Add GitHub account.**
* Select your **repository** and the **branch** from the dropdown list or quickly search.
* Click on **Next**

<figure><img src="/files/faCh2Fru8KlKWXlPPYOT" alt="Configuring the Git repository during app deployment on Clouddley."><figcaption><p>Setup the Go application repository on Clouddley</p></figcaption></figure>

#### **Step 3: Configure your Virtual Machine**

In the Choose or add server dropdown, select your virtual machine (VM) if it’s already listed. If not, select **+ Add Virtual Machine**.

Enter the following details to configure your VM:

* Hostname or IP address
* Username
* SSH port

After adding the details, use the **Clouddley CLI** (recommended) or connect via **SSH** to verify the connection.

{% tabs %}
{% tab title="Clouddley CLI" %}
The Clouddley CLI is a command-line tool that allows you to interact with the Clouddley Platform from your terminal.

* Open the command line of the remote VM you want to configure to Clouddley and install Clouddley CLI by running the command:

```bash
curl -L https://raw.githubusercontent.com/clouddley/cli/main/install.sh | sh
```

* To add the SSH public key, run the command:

```bash
clouddley add key
```

Using the CLI, you can deploy resources, manage configurations, and automate tasks efficiently.
{% endtab %}

{% tab title="SSH" %}

* Download the public key to your local machine.
* Ru**n** the provided command on your local machine, allowing Triggr to connect to your virtual machine.

```
ssh-copy-id -f -i ~/path/to/downloaded/Publickey username@ipaddress
```

{% hint style="info" %}
Replace `~/path/to/downloaded/Publickey` ,`username` and `ipaddress`  with your actual values.
{% endhint %}
{% endtab %}
{% endtabs %}

* Click on **Verify**. This verifies the connection.
* Click on **Next**

<figure><img src="/files/qtcRfmLeUDV5fe8r7nQk" alt="Configuring the virtual machine during app deployment on Clouddley."><figcaption><p>Configuration of virtual machine on Clouddley</p></figcaption></figure>

#### **Step 4: Configure app settings**

* Insert the **name** of the application and its **port.**
* Click on **Next**

<figure><img src="/files/JH0L3vhUFNpOTCFwkCnk" alt="Configuring App settings (name and port) during app deployment on Clouddley."><figcaption><p>Configure the App name and port</p></figcaption></figure>

{% hint style="info" %}
The firewall of the virtual machine should allow access to the application port.
{% endhint %}

#### **Step 5: Configure Environment Variables**&#x20;

* To add environment variables, click on  :heavy\_plus\_sign: <mark style="color:blue;">**Add Variable**</mark>&#x20;
* Choose an ENV mode: either a **single variable** or **import variables**. Learn more [here](/apps/extras/environment-variables).

{% tabs %}
{% tab title="Single Variable" %}

<figure><img src="/files/g4PjEAekY8aojSeKi1XF" alt="Image showing the single variable ENV mode on Clouddley." width="563"><figcaption><p>Single variable ENV mode</p></figcaption></figure>
{% endtab %}

{% tab title="Import Variables " %}

<figure><img src="/files/60lrDpuC46Uwr2tcIvfH" alt="Image showing the Import Variables ENV mode on Clouddley." width="563"><figcaption><p>Import variables ENV mode</p></figcaption></figure>
{% endtab %}
{% endtabs %}

* Add the key-value pairs and click on **Save**
* Click on **Next**

<figure><img src="/files/ZuYu4yCm8h6NDFWIoKvs" alt="Image showing environment variables added during app deployment on Clouddley."><figcaption><p>Adding environment variables</p></figcaption></figure>

#### **Step 6: Set up Notifications (optional)**

* To configure the **notification settings** of the application, click on :heavy\_plus\_sign: <mark style="color:blue;">**Add Alert**</mark>
* Select the **Alert type.** For this tutorial, we will set up Email alerts.
* Toggle on the buttons of the deployment event (failed, timed out, or success)  you want to be notified of.
* Enter the **Email address** where you want to receive alerts. (You can add multiple email addresses)
* Click on **Save**
* Click on **Deploy**

<figure><img src="/files/ItAmC6aXlBntUjIxE82E" alt="A gif showing how to set up notifications on Clouddley."><figcaption><p>Notifications set up and creation of Go application on Clouddley</p></figcaption></figure>

#### **Step 7: Test and Verify the app**

* Click on **Go to Dashboard.** Your app appears on the apps dashboard.
* After the app deployment is complete, the app status changes from `Deploying` to `Online`

<figure><img src="/files/QtTVLZBq7LSmmgcQvOSg" alt="An image of the overview of a successfully deployed Go application on Clouddley."><figcaption><p>Go application dashboard overview</p></figcaption></figure>

* Click on :globe\_with\_meridians: **Website** at the top right corner of the page, which opens the URL of the deployed application in your browser.
* You can test the application functionalities.

<figure><img src="/files/9C2vyvr0v3aIWRFQUqSn" alt="An image of the Go application running from Clouddley on the web."><figcaption><p>Go application running from Clouddley on a cloud virtual machine</p></figcaption></figure>

You have successfully deployed a Go application on Clouddley. You can manage it directly from the app dashboard by clicking the three dots (**...**) at the top-right corner to access **Edit**, **Instant Rollback**, **Scale**, **Pause**, and **Delete** options.

Additionally, you can switch to different tabs on the application dashboard to perform the following actions: view your **deployment** history, view or download **logs**, add a **custom domain**, and view the **environment** **variables**.

### Conclusion

Congratulations:tada: on successfully deploying a Go application on Clouddley. Check out how different frameworks can be deployed to Clouddley in our [how-to guides](/apps/how-to-guides).


# Deploy a Next.js App on Clouddley

Learn how to deploy a Next.js app on Clouddley.

Clouddley is a backend infrastructure platform for your compute resources that auto-detects your runtime and deploys your application to your server (virtual machines and bare metal). In this guide, you’ll see Clouddley in action by deploying a [Next.js](https://nextjs.org/learn/foundations/about-nextjs/what-is-nextjs) web application (built with [Next.js boilerplate](https://vercel.com/templates/next.js/nextjs-boilerplate)) to a virtual machine.

### Prerequisites

* A [GitHub](https://github.com/) or [Bitbucket](https://bitbucket.org/product) Account.
* A [Clouddley](https://app.clouddley.com/auth/signup) account.
* A [N](https://nextjs.org/learn/foundations/about-nextjs)[ext.js](https://nextjs.org/learn/foundations/about-nextjs) application.
* A virtual machine on a Cloud platform or a bare metal server.

### Deploy your Next.js Application

#### **Accessing Apps**

* Open your web browser, log in to your Clouddley account
* Navigate to [Apps](https://app.clouddley.com/apps) and click on **Deploy** **App**

<figure><img src="/files/7hiMQsGBbJLWH1hAlqJu" alt="Image of Apps dashboard."><figcaption><p>Accessing Apps </p></figcaption></figure>

#### **Step 1: Configure Service**

* Choose your Git hosting service; either **GitHub** or **Bitbucket**. For this tutorial, we will be using GitHub.
* Click on **Continue with GitHub**

<figure><img src="/files/wGRJv4utI9yHwvgWvVAW" alt="Configuring Git hosting service during app deployment on Clouddley."><figcaption><p>Choose your Git hosting service</p></figcaption></figure>

#### **Step 2: Configure Git**

* To connect your GitHub user or organization account, click the **Select username/organization** dropdown and **Add GitHub account.**
* Select your **repository** and the **branch** from the dropdown list or quickly search.
* Click on **Next**

<figure><img src="/files/faCh2Fru8KlKWXlPPYOT" alt="Configuring the Git repository during app deployment on Clouddley."><figcaption><p>Setup the Next.js application repository on Clouddley</p></figcaption></figure>

#### **Step 3: Configure your Virtual Machine**

In the Choose or add server dropdown, select your virtual machine (VM) if it’s already listed. If not, select **+ Add Virtual Machine**.

Enter the following details to configure your VM:

* Hostname or IP address
* Username
* SSH port

After adding the details, use the **Clouddley CLI** (recommended) or connect via **SSH** to verify the connection.

{% tabs %}
{% tab title="Clouddley CLI" %}
The Clouddley CLI is a command-line tool that allows you to interact with the Clouddley Platform from your terminal.

* Open the command line of the remote VM you want to configure to Clouddley and install Clouddley CLI by running the command:

```bash
curl -L https://raw.githubusercontent.com/clouddley/cli/main/install.sh | sh
```

* To add the SSH public key, run the command:

```bash
clouddley add key
```

Using the CLI, you can deploy resources, manage configurations, and automate tasks efficiently.
{% endtab %}

{% tab title="SSH" %}

* Download the public key to your local machine.
* Ru**n** the provided command on your local machine, allowing Triggr to connect to your virtual machine.

```
ssh-copy-id -f -i ~/path/to/downloaded/Publickey username@ipaddress
```

{% hint style="info" %}
Replace `~/path/to/downloaded/Publickey` ,`username` and `ipaddress`  with your actual values.
{% endhint %}
{% endtab %}
{% endtabs %}

* Click on **Verify**. This verifies the connection.
* Click on **Next**

<figure><img src="/files/qtcRfmLeUDV5fe8r7nQk" alt="Configuring the virtual machine during app deployment on Clouddley."><figcaption><p>Configuration of virtual machine on Clouddley</p></figcaption></figure>

#### **Step 4: Configure app settings**

* Insert the **name** of the application and its **port.**
* Click on **Next**

<figure><img src="/files/IEhft0hkrcW38wGihvWl" alt="Configuring App settings (name and port) during app deployment on Clouddley."><figcaption><p>Configure the App name and port</p></figcaption></figure>

{% hint style="info" %}
The firewall of the virtual machine should allow access to the application port.
{% endhint %}

#### **Step 5: Configure Environment Variables**&#x20;

* To add environment variables, click on  :heavy\_plus\_sign: <mark style="color:blue;">**Add Variable**</mark>&#x20;
* Choose an ENV mode: either a **single variable** or **import variables**. Learn more [here](/apps/extras/environment-variables).

{% tabs %}
{% tab title="Single Variable" %}

<figure><img src="/files/g4PjEAekY8aojSeKi1XF" alt="Image showing the single variable ENV mode on Clouddley" width="563"><figcaption><p>Single variable ENV mode</p></figcaption></figure>
{% endtab %}

{% tab title="Import Variables" %}

<figure><img src="/files/60lrDpuC46Uwr2tcIvfH" alt="Image showing the Import Variables ENV mode on Clouddley." width="563"><figcaption><p>Import variables ENV mode</p></figcaption></figure>
{% endtab %}
{% endtabs %}

* Add the key-value pairs and click on **Save**
* Click on **Next**

<figure><img src="/files/4LeTTOb7LcOjMxkxkbKm" alt="Image showing environment variables added during app deployment on Clouddley."><figcaption><p>Adding environment variables</p></figcaption></figure>

#### **Step 6: Set up Notifications (optional)**

* To configure the **notification settings** of the application, click on :heavy\_plus\_sign: <mark style="color:blue;">**Add Alert**</mark>
* Select the **Alert type.** For this tutorial, we will set up Email alerts.
* Toggle on the buttons of the deployment event (failed, timed out, or success)  you want to be notified of.
* Enter the **Email address** where you want to receive alerts. (You can add multiple email addresses)
* Click on **Save**
* Click on **Deploy**

<figure><img src="/files/ItAmC6aXlBntUjIxE82E" alt="A gif showing how to set up notifications on Clouddley."><figcaption><p>Notifications set up and creation of Next.js application on Clouddley</p></figcaption></figure>

#### **Step 7: Test and Verify the app**

* Click on **Go to Dashboard. Y**our app will be visible on the apps dashboard.
* After the app deployment is complete, the app status changes from `Deploying` to `Online`

<figure><img src="/files/GGFCuQ3qQlI7Zxv3tleb" alt="An image of the overview of a successfully deployed Next.js application on Clouddley."><figcaption><p>Next.js application dashboard overview</p></figcaption></figure>

* Click on :globe\_with\_meridians: **Website** at the top right corner of the page, which opens the URL of the deployed application in your browser.
* You can test the application functionalities.

<figure><img src="/files/KlNYecgQzZTjXuUk0dh3" alt="An image of the Next.js application running from Clouddley on the web."><figcaption><p>Next.js application running from Clouddley on a cloud virtual machine</p></figcaption></figure>

You have successfully deployed a Next.js application on Clouddley. You can manage it directly from the app dashboard by clicking the three dots (**...**) at the top-right corner to access **Edit**, **Instant Rollback**, **Scale**, **Pause**, and **Delete** options.

Additionally, you can switch to different tabs on the application dashboard to perform the following actions: view your **deployment** history, view or download **logs**, add a **custom domain**, and view the **environment** **variables**.

### Conclusion

Congratulations:tada: on successfully deploying a Next.js application on Clouddley. You can check out the source code for this application [here](https://github.com/clouddley/examples/tree/main/nodejs/nextjs). You can also check out how different frameworks can be deployed on Clouddley in our [how-to guides](/apps/how-to-guides).


# Deploy an Express.js Application on Clouddley

Learn how to deploy an Express.js App on Clouddley.

Clouddley makes it easy to deploy your [Express.js](https://expressjs.com/) application, ensuring zero downtime on your server. Express.js is a lightweight and flexible Node.js framework designed for building fast and scalable web applications. In this guide, we will walk you through the deployment process, showing you why Clouddley is the perfect choice for your deployments.  So, let's begin!

### Prerequisites

* A [GitHub](https://github.com/) or [Bitbucket](https://bitbucket.org/product) Account.
* A [Clouddley](https://clouddley.com/) account.
* An [Express.js](https://expressjs.com/) application.
* A virtual machine on a Cloud platform or a bare metal server.

### Deploy your Express.js Application

#### **Accessing Apps**

* Open your web browser, log in to your Clouddley account
* Navigate to [Apps](https://app.clouddley.com/apps) and click on **Deploy** **App**

<figure><img src="/files/7hiMQsGBbJLWH1hAlqJu" alt="Image of Apps dashboard on Clouddley"><figcaption><p>Accessing Apps </p></figcaption></figure>

#### **Step 1: Configure Service**

* Choose your Git hosting service; either **GitHub** or **Bitbucket**. For this tutorial, we will be using GitHub.
* Click on **Continue with GitHub**

<figure><img src="/files/wGRJv4utI9yHwvgWvVAW" alt="Configuring Git hosting service during app deployment on Clouddley."><figcaption><p>Choose your Git hosting service</p></figcaption></figure>

#### **Step 2: Configure Git**

* To connect your GitHub user or organization account, click the **Select username/organization** dropdown and **Add GitHub account.**
* Select your **repository** and the **branch** from the dropdown list or quickly search.
* Click on **Next**

<figure><img src="/files/faCh2Fru8KlKWXlPPYOT" alt="Configuring the Git repository during app deployment on Clouddley."><figcaption><p> Setup the Express.js application repository on Clouddley</p></figcaption></figure>

#### **Step 3: Configure your Virtual Machine**

In the Choose or add server dropdown, select your virtual machine (VM) if it’s already listed. If not, select **+ Add Virtual Machine**.

Enter the following details to configure your VM:

* Hostname or IP address
* Username
* SSH port

After adding the details, use the **Clouddley CLI** (recommended) or connect via **SSH** to verify the connection.

{% tabs %}
{% tab title="Clouddley CLI" %}
The Clouddley CLI is a command-line tool that allows you to interact with the Clouddley Platform from your terminal.

* Open the command line of the remote VM you want to configure to Clouddley and install Clouddley CLI by running the command:

```bash
curl -L https://raw.githubusercontent.com/clouddley/cli/main/install.sh | sh
```

* To add the SSH public key, run the command:

```bash
clouddley add key
```

Using the CLI, you can deploy resources, manage configurations, and automate tasks efficiently.
{% endtab %}

{% tab title="SSH" %}

* Download the public key to your local machine.
* Ru**n** the provided command on your local machine, allowing Triggr to connect to your virtual machine.

```
ssh-copy-id -f -i ~/path/to/downloaded/Publickey username@ipaddress
```

{% hint style="info" %}
Replace `~/path/to/downloaded/Publickey` ,`username` and `ipaddress`  with your actual values.
{% endhint %}
{% endtab %}
{% endtabs %}

* Click on **Verify**. This verifies the connection.
* Click on **Next**

<figure><img src="/files/qtcRfmLeUDV5fe8r7nQk" alt="Configuring the virtual machine during app deployment on Clouddley."><figcaption><p>Configuration of virtual machine on Clouddley</p></figcaption></figure>

#### **Step 4: Configure app settings**

* Insert the **name** of the application and its **port.**
* Click on **Next**

<figure><img src="/files/Hq0bvBA3G903RI6Z1C98" alt="Configuring App settings (name and port) during app deployment on Clouddley."><figcaption><p>Configure the App name and port</p></figcaption></figure>

{% hint style="info" %}
The firewall of the virtual machine should allow access to the application port.
{% endhint %}

#### **Step 5: Configure Environment Variables**

* To add environment variables, click on  :heavy\_plus\_sign: <mark style="color:blue;">**Add Variable**</mark>&#x20;
* Choose an ENV mode: either a **single variable** or **import variables**. Learn more [here](/apps/extras/environment-variables).

{% tabs %}
{% tab title="Single Variable" %}

<figure><img src="/files/g4PjEAekY8aojSeKi1XF" alt="Image showing the single variable ENV mode on Clouddley" width="563"><figcaption><p>Single variable ENV mode</p></figcaption></figure>
{% endtab %}

{% tab title="Import Variables" %}

<figure><img src="/files/60lrDpuC46Uwr2tcIvfH" alt="Image showing the Import Variables ENV mode on Clouddley" width="563"><figcaption><p>Import variables ENV mode</p></figcaption></figure>
{% endtab %}
{% endtabs %}

* Add the key-value pairs and click on **Save**
* Click on **Next**

<figure><img src="/files/UYEWTJ8SEpdZmZgZZnW6" alt="Image showing environment variables added during app deployment on Clouddley."><figcaption><p>Adding environment variables</p></figcaption></figure>

#### **Step 6: Set up Notifications (optional)**

* To configure the **notification settings** of the application, click on :heavy\_plus\_sign: <mark style="color:blue;">**Add Alert**</mark>
* Select the **Alert type.** For this tutorial, we will set up Email alerts.
* Toggle on the buttons of the deployment event (failed, timed out, or success)  you want to be notified of.
* Enter the **Email address** where you want to receive alerts. (You can add multiple email addresses)
* Click on **Save**
* Click on **Deploy**

<figure><img src="/files/ItAmC6aXlBntUjIxE82E" alt="A gif showing how to set up notifications on Clouddley."><figcaption><p>Notifications set up and creation of Express.js application on Clouddley</p></figcaption></figure>

#### **Step 7: Test and Verify the app**

* Click on **Go to Dashboard. Y**our app will be visible on the apps dashboard.
* After the app deployment is complete, the app status changes from `Deeploying` to `Online`

<figure><img src="/files/uDVNxqKZIA79q3QHmFhh" alt="An image of the overview of a successfully deployed Express.js application on Clouddley"><figcaption><p>Express.js application dashboard overview</p></figcaption></figure>

* Click on :globe\_with\_meridians: **Website** at the top right corner of the page, which opens the URL of the deployed application in your browser.
* You can test the application functionalities.

<figure><img src="/files/Ckf4ImmiVGVnAUGrgqXK" alt="An image of the Express.js application running from Clouddley on the web."><figcaption><p>Express.js application running from Clouddley on a cloud virtual machine</p></figcaption></figure>

The Express.js application has been successfully deployed on Clouddley. You can manage it from the application dashboard by selecting the three-dot menu (**…**) in the top-right corner, where you will find options to **Edit, Instant Rollback, Scale, Pause, or Delete** the deployment.

Additionally, you can navigate through the dashboard tabs to:

* View deployment history
* Access and download logs
* Add a custom domain
* View and manage environment variables

### **Conclusion**

You've successfully deployed an Express.js application on Clouddley! Feel free to explore the source code for this application [here](https://github.com/clouddley/examples/tree/main/nodejs/express). Additionally, check out our [how-to guides](/apps/how-to-guides) to learn more about deploying different frameworks on Clouddley.


# Extras

Find out more features and details about Apps.

{% content-ref url="/pages/QqW27c2uJpum2DiUetzp" %}
[Notifications](/apps/extras/notifications)
{% endcontent-ref %}

{% content-ref url="/pages/n5PczdHw3kD1hcEuowvv" %}
[Environment Variables](/apps/extras/environment-variables)
{% endcontent-ref %}

{% content-ref url="/pages/EGCKkfvgzcxfxdq3BSG1" %}
[How to Rollback an Application](/apps/extras/how-to-rollback-an-application)
{% endcontent-ref %}

{% content-ref url="/pages/M5REyH4JFenlvLg24cRm" %}
[Custom Domain](/apps/extras/custom-domain)
{% endcontent-ref %}

{% content-ref url="/pages/yhKaVjVzvwqBBgQUCF3y" %}
[How to Pause and Resume Applications](/apps/extras/how-to-pause-and-resume-applications)
{% endcontent-ref %}

{% content-ref url="/pages/7vQW9iXvDU9WvMzHFSj9" %}
[Scale applications on Clouddley](/apps/extras/scale-applications-on-clouddley)
{% endcontent-ref %}

{% content-ref url="/pages/Ddwbm26GngE1y7CeObda" %}
[Deploy an Application with a Dockerfile on Clouddley](/apps/extras/deploy-an-application-with-a-dockerfile-on-clouddley)
{% endcontent-ref %}


# Notifications

Notifications for Apps on Clouddley

Setting notifications keeps you informed on your app's deployment status. On Apps, you can set up notifications for your applications.

To set up notifications while creating your app, follow these instructions;

* In the Notifications section, click on :heavy\_plus\_sign: <mark style="color:blue;">**Add Alert**</mark>&#x20;
* Select the **alert type** from the dropdown menu

{% hint style="info" %}
Apps support only the **Email alert** type for now.
{% endhint %}

* Once you select the alert type, enable the **event** you want to be notified of, which could be either;
  * :white\_check\_mark: When the deployment succeeds
  * :pause\_button: When the app deployment timed out
  * :x: When the app deployment fails
* Type in the email address(es) you want to receive alerts on and click on **Save.**
* Go ahead and deploy your application.

<figure><img src="/files/Wk6KkBe0yU6Wu29HeEYK" alt="Image showing the various alert types for app deployment on Clouddley"><figcaption><p>Notification section Apps</p></figcaption></figure>


# Environment Variables

Environment variables for Apps on Clouddley.

Environment variables are key-value pairs used to configure applications dynamically without modifying code. For Apps on Clouddley, there are two modes for managing environment variables:

* **Single Variable:** Manually add individual environment variables.
* **Import Variables:** Bulk import multiple environment variables for easier management.

{% tabs %}
{% tab title="Single Variable" %}

<figure><img src="/files/g4PjEAekY8aojSeKi1XF" alt="Image showing the single variable ENV mode for Apps on Clouddley." width="563"><figcaption><p>Single Variable ENV mode</p></figcaption></figure>
{% endtab %}

{% tab title="Import Variables" %}

<figure><img src="/files/60lrDpuC46Uwr2tcIvfH" alt="Image showing the Import Variables ENV mode for Apps on Clouddley." width="563"><figcaption><p>Import variables ENV mode</p></figcaption></figure>
{% endtab %}
{% endtabs %}

You can edit environment variables at any time after creating your application, ensuring flexibility in configuration updates.


# Custom Domain

Custom Domain for Apps on Clouddley.

Setting up a custom domain enhances accessibility for users and improves your brand’s identity.&#x20;

{% hint style="info" %}
Clouddley uses [Google Cloud Armor](https://cloud.google.com/armor/docs/cloud-armor-overview#:~:text=Google%20Cloud%20Armor%20helps%20you,and%20SQL%20injection%20\(SQLi\).) in the background to protect your custom domain from distributed denial-of-service (DDoS) and other web-based attacks. It filters and routes all traffic through Google’s Load Balancer, ensuring that only legitimate requests reach your application.
{% endhint %}

To set up your custom domain on Clouddley, follow these instructions:

1. Navigate to **Apps** and select your **app.**
2. On the App dashboard, select **Custom Domain** and click on **+ Add Custom Domain.**<br>

   <figure><img src="/files/czr3vnLORLGhBXD6Ly0k" alt="Image showing the custom domain section on Clouddley."><figcaption><p>Custom domain overview page</p></figcaption></figure>
3. Enter the **name** of your domain and click on **Add Domain.**<br>

   <figure><img src="/files/AwKDEYmnSo4M2bHhSqvz" alt="Adding the domain name to an app in custom domain set up on Clouddley."><figcaption><p>Adding a domain name to setup custom domain</p></figcaption></figure>
4. Follow the instructions provided to configure a **DNS Record.**<br>

   <figure><img src="/files/vMnaco6PiPEMb4FIO3gh" alt="Configuring DNS record during custom domain set up on Clouddley."><figcaption><p>Configuring a Record for the domain</p></figcaption></figure>
5. After DNS propagation, the custom domain is **verified**. To make it a default domain, turn on **Set as default domain**.

<figure><img src="/files/rphTkyKpRyEpCqr0Xc7B" alt="Successful domain verification on Clouddley"><figcaption></figcaption></figure>

Your application is now connected to a custom domain.

<figure><img src="/files/CHWSguI6R84SrZPM8moP" alt="Custom domain set up successfully on Clouddley."><figcaption><p>Custom domain set up successfully</p></figcaption></figure>

You can add multiple custom domains to your application and set one as the default.


# How to Rollback an Application

Learn how to rollback applications on Clouddley.

Rolling back an application allows you to revert to a previous version if issues arise, ensuring stability with no downtime. On Clouddley, there are three types of rollback: **instant, manual, and automatic**. Rollback is only possible if the app has at least two successful previous deployments. This article outlines the steps to perform each rollback method.

**Rolling Back an Application on Clouddley**

To roll back your application to a previous version, follow these steps:

{% tabs %}
{% tab title="Instant Rollback" %}
**Instant rollback** lets you quickly revert to the last successful deployment with just a few clicks.

* Navigate to **Apps** and select the application to open its **Overview** page.
* Click the **More Options** menu (**⋮**) in the top-right corner.
* From the menu, select **Rollback**.

<figure><img src="/files/x2ryBjEqfkjAsUVmfUBF" alt="User performs instant rollback of an application on Clouddley."><figcaption><p>Instant rollback of  an application on Clouddley</p></figcaption></figure>
{% endtab %}

{% tab title="Manual Rollback" %}
**Manual rollback** allows you to revert to a specific previous deployment by manually selecting and restarting the build.

* Go to **Apps** and open your application's **Overview** page.
* Navigate to the **Deployments** section and select the version you want to rollback to.
* Click the **(⋮) Actions** menu next to the deployment and select **Restart Build**.

<figure><img src="/files/itgOmQ9b4mtahwlDpU2g" alt="User performs manual rollback of an application on Clouddley."><figcaption><p>Manual rollback of an application on Clouddley</p></figcaption></figure>
{% endtab %}

{% tab title="Automatic Rollback" %}
**Automatic rollback** occurs when a deployment fails due to a bug. Clouddley detects the failure and automatically reverts to the last successful deployment, ensuring stability without manual intervention.
{% endtab %}
{% endtabs %}

Rolling back an application is a quick and effective way to restore a stable version when needed. By following these steps, you can easily revert changes and maintain the reliability of your application. For further assistance, contact support.


# How to Pause and Resume Applications

Learn how to stop and resume applications on Clouddley.

Managing application availability is essential for optimizing resources on Clouddley. The ability to **pause and resume applications** allows you to temporarily stop an application when it's not in use and restart it when needed.&#x20;

To pause or resume your application on Apps, follow these steps:

**Step 1:** Navigate to the application dashboard and select the application to open its **Overview** page.

**Step 2:** Click the **More Options** menu (**⋮**) in the top-right corner.

**Step 3:** From the menu, select **Pause** to stop the application or **Resume** to restart it.

A confirmation message will appear once the action is complete: **`Pause completed!`** for paused applications and **`Resume completed!`** for resumed applications.

<figure><img src="/files/EMGmXgmMW21g5OhPduxe" alt="User pauses and resumes an application on Clouddley."><figcaption><p>Pausing and resuming an application on Clouddley</p></figcaption></figure>

#### **Conclusion**

Pausing and resuming applications is a simple yet powerful way to manage your resources efficiently. By following these steps, you can easily control application availability as needed. If you encounter any issues, contact support for assistance.


# Scale applications on Clouddley

Learn how to scale applications on Clouddley.

Scaling an application on Clouddley is simple and efficient. Users can adjust the application's resources by using the **scaling slider** to increase or decrease capacity. Clouddley support a scaling capacity ranging from a minimum of 1 to a maximum of 50.\
To scale your application on Clouddley, follow these steps:

**Step 1:** Navigate to the application dashboard and select the application to open its **Overview** page.

**Step 2:** Click the **More Options** menu (**⋮**) in the top-right corner.

**Step 3:** From the menu, select **Scale** to scale the application.

**Step 4:** Adjust the slider value to scale as needed and then click on **Update**.

<figure><img src="/files/DXFQocC9P8OFDaoH96zg" alt="An image of Apps scaling slider on Clouddley." width="563"><figcaption><p>Apps scaling slider</p></figcaption></figure>

A confirmation message  **`Scaling completed!`** will appear once scaling is complete.

<figure><img src="/files/0X7o41H1O9FHx3JxV868" alt="User scales an application on Clouddley"><figcaption><p>Scaling an application on Clouddley</p></figcaption></figure>

This allows applications to scale up during high-demand periods for optimal performance and scale down during low-traffic times to optimise resource usage. With this flexibility, Clouddley ensures efficient application management under varying loads.


# Deploy an Application with a Dockerfile on Clouddley

Learn how to deploy an application using a Dockerfile on Clouddley.

Deploying applications with a **Dockerfile** on **Clouddley** allows you to containerize and manage your application efficiently. This guide provides step-by-step instructions on deploying an Express.js application using a Dockerfile, ensuring a seamless and reliable deployment process.

## Prerequisites

* A [GitHub](https://github.com/) or [Bitbucket](https://bitbucket.org/product) Account.
* A [Clouddley](https://clouddley.com/) account.
* Basic understanding of [Docker](https://www.docker.com/).&#x20;
* An [Express.js](https://expressjs.com/) application.
* A virtual machine on a Cloud platform or bare metal server.

## Creating a Dockerfile

In the application root directory, create a Dockerfile  `triggr.dockerfile`  that defines how the app should be containerized.

{% hint style="info" %}
**Best Practice:** When creating a Dockerfile, use a lightweight base image (e.g., `node:alpine` for Node.js apps) to reduce image size. Always specify exact versions for dependencies to ensure consistency.
{% endhint %}

{% code title="triggr.dockerfile" %}

```docker
# Use an official Node.js runtime as a parent image
FROM node:18-alpine

# Set the working directory in the container
WORKDIR /app

# Copy package.json and package-lock.json first for dependency installation
COPY package*.json ./

# Install dependencies
RUN npm install --omit=dev  # Use --omit=dev for production builds

# Copy the rest of the application code
COPY . .

# Expose the application port (ensure it matches the port your app listens on)
EXPOSE 3011

# Define the command to run the application
CMD ["node", "./bin/www"]
```

{% endcode %}

### Building and Running the Container Locally

Before deploying to **Apps**, verify that the container works locally.

1. **Build the Docker image**:

   ```
   docker build -t my-express-app -f triggr.dockerfile .
   ```
2. **Run the container**:

   ```
   docker run -d -p 3011:3011 --name express-container my-express-app
   ```
3. **Verify the app is running** by visiting `http://localhost:3011`.

### Deploying the Application

#### **Accessing Apps**

* Open your web browser, log in to your Clouddley account
* Navigate to [Apps](https://app.clouddley.com/apps) and click on **Deploy** **App.**

<figure><img src="/files/7hiMQsGBbJLWH1hAlqJu" alt="Image of Apps dashboard on Clouddley."><figcaption><p>Accessing Apps </p></figcaption></figure>

#### **Step 1: Configure Service**

* Choose your Git hosting service; either **GitHub** or **Bitbucket**. For this tutorial, we will be using GitHub.
* Click on **Continue with GitHub**

<figure><img src="/files/wGRJv4utI9yHwvgWvVAW" alt="Configuring Git hosting service during app deployment on Clouddley."><figcaption><p>Choose your Git hosting service</p></figcaption></figure>

#### **Step 2: Configure Git**

* To connect your GitHub user or organization account, click the **Select username/organization** dropdown and **Add GitHub account.**
* Select your **repository** and the **branch** from the dropdown list or quickly search.
* Click on **Next**

<figure><img src="/files/faCh2Fru8KlKWXlPPYOT" alt="Configuring the Git repository during app deployment on Clouddley."><figcaption><p>Setup the Express.js application repository on Clouddley</p></figcaption></figure>

#### **Step 3: Configure your Virtual Machine**

In the Choose or add server dropdown, select your virtual machine (VM) if it’s already listed. If not, select **+ Add Virtual Machine**.

Enter the following details to configure your VM:

* Hostname or IP address
* Username
* SSH port

After adding the details, use the **Clouddley CLI** (recommended) or connect via **SSH** to verify the connection.

{% tabs %}
{% tab title="Clouddley CLI" %}
The Clouddley CLI is a command-line tool that allows you to interact with the Clouddley Platform from your terminal.

* Open the command line of the remote VM you want to configure to Clouddley and install Clouddley CLI by running the command:

```bash
curl -L https://raw.githubusercontent.com/clouddley/cli/main/install.sh | sh
```

* To add the SSH public key, run the command:

```bash
clouddley add key
```

Using the CLI, you can deploy resources, manage configurations, and automate tasks efficiently.
{% endtab %}

{% tab title="SSH" %}

* Download the public key to your local machine.
* Ru**n** the provided command on your local machine, allowing Clouddley to connect to your virtual machine.

```
ssh-copy-id -f -i ~/path/to/downloaded/Publickey username@ipaddress
```

{% hint style="info" %}
Replace `~/path/to/downloaded/Publickey` ,`username` and `ipaddress`  with your actual values.
{% endhint %}
{% endtab %}
{% endtabs %}

* Click on **Verify**. This verifies the connection.
* Click on **Next**

<figure><img src="/files/qtcRfmLeUDV5fe8r7nQk" alt="Configuring the virtual machine during app deployment on Clouddley."><figcaption><p>Configuration of virtual machine on Clouddley</p></figcaption></figure>

#### **Step 4: Configure app settings**

* Insert the **name** of the application and its **port.**
* Click on **Next**

<figure><img src="/files/Hq0bvBA3G903RI6Z1C98" alt="Configuring App settings (name and port) during app deployment on Clouddley."><figcaption><p>Configure the App name and port</p></figcaption></figure>

{% hint style="info" %}
The firewall of the virtual machine should allow access to the application port.
{% endhint %}

#### **Step 5: Configure Environment Variables**&#x20;

* To add environment variables, click on  :heavy\_plus\_sign: <mark style="color:blue;">**Add Variable**</mark>&#x20;
* Choose an **ENV mode**, which can be either single or **import variables.** Learn more [here](/apps/extras/environment-variables).

{% tabs %}
{% tab title="Single Variable" %}

<figure><img src="/files/g4PjEAekY8aojSeKi1XF" alt="Image showing the single variable ENV mode on Clouddley." width="563"><figcaption><p>Single variable ENV mode</p></figcaption></figure>
{% endtab %}

{% tab title="Import Variables" %}

<figure><img src="/files/60lrDpuC46Uwr2tcIvfH" alt="Image showing the Import Variables ENV mode on Clouddley." width="563"><figcaption><p>Import variables ENV mode</p></figcaption></figure>
{% endtab %}
{% endtabs %}

* Add the key-value pairs and click on **Save**
* Click on **Next**

<figure><img src="/files/UYEWTJ8SEpdZmZgZZnW6" alt="Image showing environment variables added during app deployment on Clouddley."><figcaption><p>Adding environment variables</p></figcaption></figure>

#### **Step 6: Set up Notifications (optional)**

* To configure the **notification settings** of the application, click on :heavy\_plus\_sign: <mark style="color:blue;">**Add Alert**</mark>
* Select the **Alert type.** For this tutorial, we will set up Email alerts.
* Toggle on the buttons of the deployment event (failed, timed out, or success)  you want to be notified of.
* Enter the **Email address** where you want to receive alerts. (You can add multiple email addresses)
* Click on **Save**
* Click on **Deploy**

<figure><img src="/files/ItAmC6aXlBntUjIxE82E" alt="A gif showing how to set up notifications on Clouddley."><figcaption><p>Notifications set up and creation of Express.js application on Clouddley</p></figcaption></figure>

#### **Step 7: Test and Verify the app**

* Click on **Go to Dashboard. Y**our app will be visible on the apps dashboard.
* After the app deployment is complete, the app status changes from `Deploying` to `Online`&#x20;

<figure><img src="/files/uDVNxqKZIA79q3QHmFhh" alt="An image of the overview of a successfully deployed Express.js application on Clouddley."><figcaption><p>Express.js application dashboard overview</p></figcaption></figure>

* Click on :globe\_with\_meridians: **Website** at the top right corner of the page, which opens the URL of the deployed application in your browser.
* You can test the application functionalities.

<figure><img src="/files/Ckf4ImmiVGVnAUGrgqXK" alt="An image of the Express.js application running from Clouddley on the web."><figcaption><p>Express.js application running from Clouddley on a cloud virtual machine</p></figcaption></figure>

The Express.js application has been successfully deployed on Clouddley with a Dockerfile. You can manage it from the application dashboard by selecting the three-dot menu (**…**) in the top-right corner, where you will find options to **Edit, Instant Rollback, Scale, Pause, or Delete** the deployment.

Additionally, you can navigate through the dashboard tabs to:

* View deployment history
* Access and download logs
* Add a custom domain
* View and manage environment variables

## Conclusion

Following these steps, you have successfully deployed an Express.js application with a **Dockerfile** on Clouddley. This method ensures a consistent, scalable, and efficient deployment workflow.  Check out the source code for this application [here](https://github.com/clouddley/examples/tree/main/nodejs/express).


# Using Multiple Ports in Your App Deployment

Learn how to use multiple ports in your app deployment on Clouddley.

Until now, when you deployed an app on Clouddley, you could only publish one port. That worked fine for simple apps, but many modern applications need more than one way to connect.

We’ve listened, and we’ve made it better. Clouddley now supports multiple ports. This means you can run apps that expose both HTTP and gRPC, or any combination your workload needs, without extra workarounds.

### Why this matters

Developers often build apps that serve different types of traffic. For example:

* A web app that uses **HTTP** for users and **gRPC** for internal services
* An API that exposes **REST** on one port and an **admin dashboard** on another
* A service that needs to handle both **secure** and **non-secure** connections

With multiple port support, Clouddley makes these setups simple. You don’t have to split workloads or hack around the limitations anymore.

### How it works

When you deploy your app, you can now define more than one port. Each port can handle its own traffic type, and Clouddley will manage the routing for you. It’s as easy as adding another port in your configuration.

### Example: Using Multiple Ports

In this example, your app needs to handle traffic on both HTTP (80) and HTTPS (443). You can set this up during app deployment with Clouddley.

In **Step 4: Configure App settings**. Add both ports to the ports field.<br>

<figure><img src="/files/jZe8PMkMw8u51j6CPJyh" alt="Multiple port configuration for an app with port 80 &#x26; 443."><figcaption><p>Multiple ports configured as a port in app settings</p></figcaption></figure>

{% hint style="info" %}
List the ports with a comma and no spaces in between.
{% endhint %}

### What’s next

This is part of our bigger goal: to give you flexibility without complexity. Multiple port support helps you build and scale apps the way they’re meant to run.

Try it out today and see how much smoother your deployments can be.


# Databases

An overview of deploying databases on Clouddley, including its key features to help you get started.

<figure><img src="/files/GSHPO7Q0ectrcxijFa0l" alt="Image of Databases dashboard on Clouddley."><figcaption><p>Databases Dashboard</p></figcaption></figure>

### Overview

Databases represent your database workloads deployed on Clouddley running on virtual machines, servers, and bare metal with zero downtime. It automatically creates your selected database engine, whether it's **PostgreSQL, Redis, MongoDB, or others,** and provisions it using cloud-native tooling. It simplifies database setup, maintenance, and security.

### Key Features

Here are the key features supported by Databases;

* **Support for Multiple Databases**\
  Whether you’re working with PostgreSQL, MySQL, MongoDB, or Redis, you can easily deploy and manage them all in one place.
* **Real-Time Database Logs**\
  Stay on top of performance and troubleshoot issues quickly with detailed logging.
* **Password reset**\
  Easily reset passwords for users securely with built-in authentication and encryption.
* **Supports delete protection**\
  Prevent accidental data loss, which safeguards against unintended deletions.


# How-to Guides

Learn how to deploy different databases to Clouddley.

<table data-view="cards"><thead><tr><th></th><th data-hidden data-card-cover data-type="files"></th><th data-hidden data-type="content-ref"></th><th data-hidden data-card-target data-type="content-ref"></th></tr></thead><tbody><tr><td>Deploy a MongoDB Database on Clouddley</td><td><a href="/files/inPID5KwBlYF0jtKQZ1w">/files/inPID5KwBlYF0jtKQZ1w</a></td><td><a href="/pages/XfcDMTeF3kHX7hiRl8Mk">/pages/XfcDMTeF3kHX7hiRl8Mk</a></td><td><a href="/pages/XfcDMTeF3kHX7hiRl8Mk">/pages/XfcDMTeF3kHX7hiRl8Mk</a></td></tr><tr><td>Deploy a MariaDB Database on Clouddley</td><td><a href="/files/jh0WCfuwKqx7bvKBgHWb">/files/jh0WCfuwKqx7bvKBgHWb</a></td><td><a href="/pages/wgK26AhK3OR9xHwjFLFg">/pages/wgK26AhK3OR9xHwjFLFg</a></td><td><a href="/pages/wgK26AhK3OR9xHwjFLFg">/pages/wgK26AhK3OR9xHwjFLFg</a></td></tr><tr><td>Deploy a PostgreSQL Database on Clouddley</td><td><a href="/files/GCJSaLKpRpxjUSpcKOmZ">/files/GCJSaLKpRpxjUSpcKOmZ</a></td><td></td><td><a href="/pages/La5PJv6Jql29becMEyKH">/pages/La5PJv6Jql29becMEyKH</a></td></tr><tr><td>Deploy a Redis Database on Clouddley</td><td><a href="/files/8tXu24DWRahkfIIpF6eG">/files/8tXu24DWRahkfIIpF6eG</a></td><td></td><td><a href="/pages/4iDIOxnxGTQ2PakQNZXk">/pages/4iDIOxnxGTQ2PakQNZXk</a></td></tr><tr><td>Deploy a MySQL Database on Clouddley</td><td><a href="/files/IXX9wMYMyWGiHACQu5uv">/files/IXX9wMYMyWGiHACQu5uv</a></td><td></td><td><a href="/pages/dvbPO2nO4qZz4zCJ2foe">/pages/dvbPO2nO4qZz4zCJ2foe</a></td></tr></tbody></table>


# Deploy a MongoDB Database on Clouddley

Learn how to deploy a MongoDB database on Clouddley.

With [Clouddley](https://clouddley.com/triggr), you can easily deploy and manage a [MongoDB](https://www.mongodb.com/) database, a flexible and scalable NoSQL database designed for handling large volumes of data. This guide walks you through the steps to set up a MongoDB database on Clouddley. Whether you are a beginner or an experienced developer,  your database will be up and running quickly.

## Prerequisites

* A [Clouddley](https://clouddley.com/) account
* A virtual machine on a Cloud platform or bare metal server.

## Step-by-step deployment

{% stepper %}
{% step %}

### Accessing Databases

* Log in to your [Clouddley](https://clouddley.com/) account.
* Navigate to [**Databases**](https://app.clouddley.com/services) and Click on **Deploy Database**

<figure><img src="/files/ruvrS2Z6oFAWXeTcQdEW" alt="Image of Databases dashboard on Clouddley"><figcaption><p>Accessing Databases</p></figcaption></figure>
{% endstep %}

{% step %}

### Configure your Virtual Machine (VM)

In the Choose or add server dropdown, select your virtual machine (VM) if it’s already listed. If not, select **+ Add Virtual Machine**.

Enter the required details:

<table><thead><tr><th width="127"></th><th></th></tr></thead><tbody><tr><td><strong>VM Host</strong></td><td><em>Provide the host address of your virtual machine</em></td></tr><tr><td><strong>VM User</strong></td><td><em>Input the username required to access the virtual machine</em></td></tr><tr><td><strong>Port</strong></td><td><em>Specify the port number for the connection</em></td></tr></tbody></table>

* Use the **Clouddley CLI** (recommended) or connect via **SSH** to verify.

{% tabs %}
{% tab title="Clouddley CLI" %}
The Clouddley CLI is a command-line tool that allows you to interact with the Clouddley Platform from your terminal.

* Open the command line of the remote VM you want to configure to Clouddley and install Clouddley CLI by running the command:

```bash
curl -L https://raw.githubusercontent.com/clouddley/cli/main/install.sh | sh
```

* To add the SSH public key, run the command:

```bash
clouddley add key
```

Using the CLI, you can deploy resources, manage configurations, and automate tasks efficiently.
{% endtab %}

{% tab title="SSH" %}

* Download the public key to your local machine.
* Run the provided command on your local machine, allowing Clouddley to connect to your virtual machine.

```
ssh-copy-id -f -i ~/path/to/downloaded/Publickey username@ipaddress
```

{% hint style="info" %}
Replace `~/path/to/downloaded/Publickey` ,`username` and `ipaddress`  with your actual values.
{% endhint %}
{% endtab %}
{% endtabs %}

* Click on **Verify** to validate the details and confirm the connection.
* Click on **Next** to continue the setup process.

<figure><img src="/files/EXJ5A5sOylj5OrGiPmWe" alt="Configuring the virtual machine during database deployment on Clouddley."><figcaption><p>Configuring the virtual machine to host your database</p></figcaption></figure>
{% endstep %}

{% step %}

### Database Name

* Please enter a unique **name** for your database to distinguish it within the virtual machine (VM).
* Click on **Next**

<figure><img src="/files/fyEmoaRGM4FyX4CROhhN" alt="Configuring database name on Clouddley."><figcaption><p>Defining a unique name for the MongoDB database</p></figcaption></figure>
{% endstep %}

{% step %}

### Select the Database type and version

* Choose **MongoDB** database
* Choose the desired **version** from the dropdown menu to ensure compatibility with your application.
* (Optional) Enable the **Delete Protection** option to safeguard your MongoDB database from accidental deletion.

{% hint style="info" %}
This feature prevents the database from being destroyed unless explicitly disabled.
{% endhint %}

* Click on **Deploy DB**

<figure><img src="/files/9gia2RKK1SJsgExwjxCp" alt="User selecting the MongoDB database type and version."><figcaption><p>Selecting the MongoDB database type and specifying the version for deployment</p></figcaption></figure>
{% endstep %}

{% step %}

### Confirm Deployment

* Once the deployment process is complete, your **MongoDB database** is ready.&#x20;
* Click <mark style="color:blue;">**Go to Dashboard**</mark> to access and manage your database.

<figure><img src="/files/OHOsvGtjx072XMotnqhE" alt="Image of MongoDB database deployed successfully on Clouddley."><figcaption><p>MongoDB database successfully deployed</p></figcaption></figure>
{% endstep %}
{% endstepper %}

## Database Dashboard

You can access and manage your database through the user-friendly dashboard.

{% tabs %}
{% tab title="Overview" %}
View details about your database, VM, and settings (e.g., Delete Protection), and use the option to delete the database if it is no longer needed.&#x20;

<figure><img src="/files/S7DOc6VQY3CIkst17Fju" alt="An image of the overview section of the MongoDB database deployed on Clouddley."><figcaption><p>The dashboard overview with a high-level summary of database performance and status</p></figcaption></figure>
{% endtab %}

{% tab title="Connections" %}
Access public and private network details, including **username**, **password**, **host**, **port**, and **database** type.

<figure><img src="/files/9AETZP40tDLT6eExCMcY" alt="An image of the connections section of the MongoDB database deployed on Clouddley."><figcaption><p>View the public and private network connections to the MongoDB database</p></figcaption></figure>
{% endtab %}

{% tab title="Logs" %}
Monitor real-time log streams for troubleshooting and download logs for further analysis.

<figure><img src="/files/KRh2rXJeCindn7I8eUCh" alt="An image of the logs section of the MongoDB database deployed on Clouddley."><figcaption><p>Real-time logs for insights into database activity</p></figcaption></figure>
{% endtab %}

{% tab title="Users" %}
Manage a list of database users and securely reset passwords as needed.

<figure><img src="/files/pC8B8C331l7lFjeAG0Dk" alt="An image of the users section of the MongoDB database deployed on Clouddley."><figcaption><p>Manage database users through the dashboard's users section</p></figcaption></figure>
{% endtab %}
{% endtabs %}

## Conclusion

Clouddley makes database hosting effortless with its scalable, reliable, and user-friendly platform. It simplifies database management so you can focus on your applications. Check out our other articles to learn [how to deploy and manage different databases](/databases/how-to-guides) on the Clouddley.<br>


# Deploy a MariaDB Database on Clouddley

Learn how to deploy a MariaDB database on Clouddley.

Setting up and managing a [MariaDB](https://mariadb.org/) database is simple and efficient with [Clouddley](https://clouddley.com/triggr). MariaDB is a powerful, open-source relational database known for its speed and reliability. This guide walks you through the deployment process on Clouddley, making it easy for beginners and experienced developers to get their database up and running quickly.

## Prerequisites

* A [Clouddley](https://clouddley.com/) account.
* A virtual machine on a Cloud platform or a bare metal server.

## Step-by-step deployment

{% stepper %}
{% step %}

### Accessing Databases

* Log in to your [Clouddley](https://clouddley.com/) account.
* Navigate to [**Databases**](https://app.clouddley.com/services) and Click on **Deploy Database**

<figure><img src="/files/ruvrS2Z6oFAWXeTcQdEW" alt="Image of Databases dashboard on Clouddley."><figcaption><p>Accessing Databasess</p></figcaption></figure>
{% endstep %}

{% step %}

### Configure your Virtual Machine (VM)

In the Choose or add server dropdown, select your virtual machine (VM) if it’s already listed. If not, select **+ Add Virtual Machine**.

Enter the required details:

<table><thead><tr><th width="127"></th><th></th></tr></thead><tbody><tr><td><strong>VM Host</strong></td><td><em>Provide the host address of your virtual machine.</em></td></tr><tr><td><strong>VM User</strong></td><td><em>Input the username required to access the virtual machine</em></td></tr><tr><td><strong>Port</strong></td><td><em>Specify the port number for the connection</em></td></tr></tbody></table>

* Use the **Clouddley CLI** (recommended) or connect via **SSH** to verify.

{% tabs %}
{% tab title="Clouddley CLI" %}
The Clouddley CLI is a command-line tool that allows you to interact with the Clouddley Platform from your terminal.

* Open the command line of the remote VM you want to configure to Clouddley and install Clouddley CLI by running the command:

```bash
curl -L https://raw.githubusercontent.com/clouddley/cli/main/install.sh | sh
```

* To add the SSH public key, run the command:

```bash
clouddley add key
```

Using the CLI, you can deploy resources, manage configurations, and automate tasks efficiently.
{% endtab %}

{% tab title="SSH" %}

* Download the public key to your local machine.
* Ru**n** the provided command on your local machine, allowing Clouddley to connect to your virtual machine.

```
ssh-copy-id -f -i ~/path/to/downloaded/Publickey username@ipaddress
```

{% hint style="info" %}
Replace `~/path/to/downloaded/Publickey` ,`username` and `ipaddress`  with your actual values.
{% endhint %}
{% endtab %}
{% endtabs %}

* Click on **Verify** to validate the details and confirm the connection.
* Click **Next** to proceed.

<figure><img src="/files/EXJ5A5sOylj5OrGiPmWe" alt="Configuring the virtual machine during database deployment on Clouddley."><figcaption><p>Configuring the virtual machine to host your database</p></figcaption></figure>
{% endstep %}

{% step %}

### Database Name

* Enter a unique **name** for your database for easy identification within the virtual machine (VM).
* Click on **Next**

<figure><img src="/files/dammddR23U3yJSnFo1Yb" alt="Configuring database name on Clouddley."><figcaption><p>Defining a unique name for the MariaDB database</p></figcaption></figure>
{% endstep %}

{% step %}

### Select the Database type and version

* Select **MariaDB** from the dropdown menu
* Select the preferred **version** from the dropdown menu to ensure compatibility with your application.
* (Optional) Enable the Delete Protection option to prevent accidental deletion of your MariaDB database.

{% hint style="info" %}
This feature prevents the database from being destroyed unless explicitly disabled.
{% endhint %}

* Click on **Deploy DB**

<figure><img src="/files/gsl5nVlnoddg0QeoHhyR" alt="User selecting the MariaDB database type and version."><figcaption><p>Selecting the MariaDB database type and specifying the version for deployment</p></figcaption></figure>
{% endstep %}

{% step %}

### Confirm Deployment

* Once the deployment is complete, your MariaDB database is ready.
* Click **Go to Dashboard** to access and manage your database.

<figure><img src="/files/OHOsvGtjx072XMotnqhE" alt="Image of MariaDB database deployed successfully on Clouddley."><figcaption><p>MariaDB database successfully deployed</p></figcaption></figure>
{% endstep %}
{% endstepper %}

## Database Dashboard

You can access and manage your database using the user-friendly dashboard interface.

{% tabs %}
{% tab title="Overview" %}
View details about your database, VM, and settings (e.g., Delete Protection), and use the option to delete the database if it is no longer needed.&#x20;

<figure><img src="/files/uwSjOB4W3LyQNrh6A45j" alt="An image of the overview section of the MariaDB database deployed on Clouddley.."><figcaption><p>The dashboard overview with a high-level summary of database performance and status</p></figcaption></figure>
{% endtab %}

{% tab title="Connections" %}
Access public and private network details, including username, password, host, port, and database type.

<figure><img src="/files/InstyX6HeCmtvs5AU19X" alt="An image of the connections section of the MariaDB database deployed on Clouddley."><figcaption><p>View the public and private network connections to the MariaDB database</p></figcaption></figure>
{% endtab %}

{% tab title="Logs" %}
Monitor real-time log streams for troubleshooting and download logs for further analysis.

<figure><img src="/files/7yoLtb05GqwCff20tJ15" alt="An image of the logs section of the MariaDB database deployed on Clouddley."><figcaption><p>Real-time logs for insights into database activity</p></figcaption></figure>
{% endtab %}

{% tab title="Users" %}
Manage a list of database users and securely reset passwords as needed.

<figure><img src="/files/CtqbZxTfODVXdM1wYFtp" alt="An image of the users section of the MariaDB database deployed on Clouddley."><figcaption><p>Manage database users through the dashboard's users section</p></figcaption></figure>
{% endtab %}
{% endtabs %}

## Conclusion

Clouddley makes deploying a MariaDB database easy and hassle-free, allowing you to focus on your applications instead of database management. Explore our [other guides](/databases/how-to-guides) to learn how to deploy different databases on Clouddley.


# Deploy a PostgreSQL Database on Clouddley.

Learn how to deploy a PostgreSQL database on Clouddley.

Deploying and managing a [PostgreSQL](https://www.postgresql.org/) database is easy with [Clouddley](https://clouddley.com/triggr). PostgreSQL is a powerful open-source relational database known for its robustness and extensibility. This guide walks you through the setup process on Clouddley, ensuring a smooth and efficient deployment experience for developers of all skill levels.

## Prerequisites

* A [Clouddley](https://clouddley.com/) account
* A virtual machine on a Cloud platform or a bare metal server.

## Step-by-step deployment

{% stepper %}
{% step %}

### Accessing Databases

* Log in to your [Clouddley](https://clouddley.com/) account.
* Navigate to [**Databases**](https://app.clouddley.com/services) and Click on **Deploy Database**

<figure><img src="/files/ruvrS2Z6oFAWXeTcQdEW" alt="Image of Databases dashboard on Clouddley."><figcaption><p>Accessing Databases</p></figcaption></figure>
{% endstep %}

{% step %}

### Configure your Virtual Machine (VM)

In the Choose or add server dropdown, select your virtual machine (VM) if it’s already listed. If not, select **+ Add Virtual Machine**.

Enter the required details:

<table><thead><tr><th width="127"></th><th></th></tr></thead><tbody><tr><td><strong>VM Host</strong></td><td><em>Provide the host address of your virtual machine.</em></td></tr><tr><td><strong>VM User</strong></td><td><em>Input the username required to access the virtual machine</em></td></tr><tr><td><strong>Port</strong></td><td><em>Specify the port number for the connection</em></td></tr></tbody></table>

* Use the **Clouddley CLI** (recommended) or connect via **SSH** to verify.

{% tabs %}
{% tab title="Clouddley CLI" %}
The Clouddley CLI is a command-line tool that allows you to interact with the Clouddley Platform from your terminal.

* Open the command line of the remote VM you want to configure to Clouddley and install Clouddley CLI by running the command:&#x20;

```bash
curl -L https://raw.githubusercontent.com/clouddley/cli/main/install.sh | sh
```

* To add the SSH public key, run the command:

```bash
clouddley add key
```

Using the CLI, you can deploy resources, manage configurations, and automate tasks efficiently.
{% endtab %}

{% tab title="SSH" %}

* Download the public key to your local machine.
* Ru**n** the provided command on your local machine, allowing Clouddley to connect to your virtual machine.

```
ssh-copy-id -f -i ~/path/to/downloaded/Publickey username@ipaddress
```

{% hint style="info" %}
Replace `~/path/to/downloaded/Publickey` ,`username` and `ipaddress`  with your actual values.
{% endhint %}
{% endtab %}
{% endtabs %}

* Click **Verify** to validate the details and confirm the connection.
* Click **Next** to continue.

<figure><img src="/files/EXJ5A5sOylj5OrGiPmWe" alt="Configuring the virtual machine during database deployment on Clouddley."><figcaption><p>Configuring the virtual machine to host your database</p></figcaption></figure>
{% endstep %}

{% step %}

### Database Name

* Provide a unique **name** for your database to ensure easy identification within the virtual machine (VM).
* Click **Next** to proceed.

<figure><img src="/files/8GoDrX6WPqoSkOsNcH6J" alt="Configuring database name on Clouddley."><figcaption><p>Defining a unique name for the PostgreSQL database</p></figcaption></figure>
{% endstep %}

{% step %}

### Select the Database type and version

* Choose **PostgreSQL** from the dropdown menu
* Select your preferred version to ensure compatibility with your application.
* (Optional) Enable the Delete Protection option to prevent accidental deletion of your PostgreSQL database.

{% hint style="info" %}
This feature prevents the database from being destroyed unless explicitly disabled.
{% endhint %}

* Click on **Deploy DB**

<figure><img src="/files/FRhwBpELYHPwOoIKHfQI" alt="User selecting the PostgreSQL database type and version."><figcaption><p>Selecting the PostgreSQL database type and specifying the version for deployment</p></figcaption></figure>
{% endstep %}

{% step %}

### Confirm Deployment

* After the deployment is complete, your PostgreSQL database is ready.
* Click **Go to Dashboard** to access and manage it.

<figure><img src="/files/OHOsvGtjx072XMotnqhE" alt="Image of PostgreSQL database deployed successfully on Clouddley."><figcaption><p>PostgreSQL database successfully deployed</p></figcaption></figure>
{% endstep %}
{% endstepper %}

## Database Dashboard

You can access and manage your database using the user-friendly dashboard interface.

{% tabs %}
{% tab title="Overview" %}
View details about your database, VM, and settings (e.g., Delete Protection), and use the option to delete the database if it is no longer needed.&#x20;

<figure><img src="/files/TE04XMTwk2EFvmoDYEC0" alt="An image of the overview section of the PostgreSQL database deployed on Clouddley."><figcaption><p>The dashboard overview with a high-level summary of database performance and status</p></figcaption></figure>
{% endtab %}

{% tab title="Connections" %}
Access public and private network details, including username, password, host, port, and database type.

<figure><img src="/files/64sdHtbBu4LcLENdzPH6" alt="An image of the connections section of the PostgreSQL database deployed on Clouddley."><figcaption><p>View the public and private network connections to the PostgreSQL database</p></figcaption></figure>
{% endtab %}

{% tab title="Logs" %}
Monitor real-time log streams for troubleshooting and download logs for further analysis.

<figure><img src="/files/SFWPOJMmynn9qJFdNUR7" alt="An image of the logs section of the PostgreSQL database deployed on Clouddley."><figcaption><p>Real-time logs for insights into database activity</p></figcaption></figure>
{% endtab %}

{% tab title="Users" %}
Manage a list of database users and securely reset passwords as needed.

<figure><img src="/files/u8jxW2xkSblk9XprqFFi" alt="An image of the users section of the PostgreSQL database deployed on Clouddley."><figcaption><p>Manage database users through the dashboard's users section</p></figcaption></figure>
{% endtab %}
{% endtabs %}

## Conclusion

Deploying a PostgreSQL database on Clouddley is quick, efficient, and scalable. With its database management features, you can focus on your applications while Clouddley handles the heavy lifting. Check out our [other guides](/databases/how-to-guides) to learn how to deploy various databases on Clouddley.


# Deploy a Redis Database on Clouddley

Learn how to deploy a Redis database on Clouddley.

[Clouddley](https://clouddley.com/triggr) makes it easy to deploy and manage a [Redis](https://redis.io/) database, a high-performance in-memory data store known for its speed and versatility. This guide walks you through the deployment process on Clouddley, you'll have your database up and running quickly.

## Prerequisites

* A [Clouddley](https://clouddley.com/) account
* A virtual machine on a Cloud platform or bare metal server.

## Step-by-step deployment

{% stepper %}
{% step %}

### Accessing Databases

* Log in to your [Clouddley](https://clouddley.com/) account.
* Navigate to [**Databases**](https://app.clouddley.com/services) and Click on **Deploy Database**

<figure><img src="/files/ruvrS2Z6oFAWXeTcQdEW" alt="Image of Databases dashboard on Clouddley"><figcaption><p>Accessing Databases</p></figcaption></figure>
{% endstep %}

{% step %}

### Configure the Virtual Machine (VM)

In the Choose or add server dropdown, select your virtual machine (VM) if it’s already listed. If not, select **+ Add Virtual Machine**.

Enter the required details:

<table><thead><tr><th width="127"></th><th></th></tr></thead><tbody><tr><td><strong>VM Host</strong></td><td><em>Provide the host address of your virtual machine.</em></td></tr><tr><td><strong>VM User</strong></td><td><em>Input the username required to access the virtual machine</em></td></tr><tr><td><strong>Port</strong></td><td><em>Specify the port number for the connection</em></td></tr></tbody></table>

* Use the **Clouddley CLI** (recommended) or connect via **SSH** to verify.

{% tabs %}
{% tab title="Clouddley CLI" %}
The Clouddley CLI is a command-line tool that allows you to interact with the Clouddley Platform from your terminal.

* Open the command line of the remote VM you want to configure to Clouddley and install Clouddley CLI by running the command:

```bash
curl -L https://raw.githubusercontent.com/clouddley/cli/main/install.sh | sh
```

* To add the SSH public key, run the command:

```bash
clouddley add key
```

Using the CLI, you can deploy resources, manage configurations, and automate tasks efficiently.
{% endtab %}

{% tab title="SSH" %}

* Download the public key to your local machine.
* Ru**n** the provided command on your local machine, allowing Triggr to connect to your virtual machine.

```
ssh-copy-id -f -i ~/path/to/downloaded/Publickey username@ipaddress
```

{% hint style="info" %}
Replace `~/path/to/downloaded/Publickey` ,`username` and `ipaddress`  with your actual values.
{% endhint %}
{% endtab %}
{% endtabs %}

* Click on **Verify** to validate the details and confirm the connection.
* Click **Next** to proceed.

<figure><img src="/files/EXJ5A5sOylj5OrGiPmWe" alt="Configuring the virtual machine during database deployment on Clouddley."><figcaption><p>Configuring the virtual machine to host your database</p></figcaption></figure>
{% endstep %}

{% step %}

### Database Name

* Enter a unique **name** for your database for easy identification within the virtual machine (VM).
* Click on **Next**

<figure><img src="/files/GWrd5RjAWfooZHzavZ2x" alt="Configuring database name on Clouddley."><figcaption><p>Defining a unique name for the Redis database</p></figcaption></figure>
{% endstep %}

{% step %}

### Select the Database type and version

* Select **Redis** from the dropdown menu
* Select the preferred **version** from the dropdown menu to ensure compatibility with your application.
* (Optional) Enable the Delete Protection option to prevent accidental deletion of your MariaDB database.

{% hint style="info" %}
This feature prevents the database from being destroyed unless explicitly disabled.
{% endhint %}

* Click on **Deploy DB**

<figure><img src="/files/E1OTqBTs3InJkQt4gTVg" alt="User selecting the Redis database type and version."><figcaption><p>Selecting the Redis database type and specifying the version for deployment</p></figcaption></figure>
{% endstep %}

{% step %}

### Confirm Deployment

* Once the deployment is complete, your Redis database is ready.
* Click **Go to Dashboard** to access and manage your database.

<figure><img src="/files/OHOsvGtjx072XMotnqhE" alt="Image of Redis database deployed successfully on Triggr Databases."><figcaption><p>Redis database successfully deployed</p></figcaption></figure>
{% endstep %}
{% endstepper %}

## Database Dashboard

You can access and manage your database using the user-friendly dashboard interface.

{% tabs %}
{% tab title="Overview" %}
View details about your database, VM, and settings (e.g., Delete Protection), and use the option to delete the database if it is no longer needed.

<figure><img src="/files/CGbRFLmPfAvawrvmveLL" alt="An image of the overview section of the Redis database deployed on Clouddley."><figcaption><p>The dashboard overview with a high-level summary of database performance and status</p></figcaption></figure>
{% endtab %}

{% tab title="Connections" %}
Access public and private network details, including username, password, host, port, and database type.

<figure><img src="/files/a2q2naEyctCuHbVRek61" alt="An image of the connections section of the Redis database deployed on Clouddley."><figcaption><p>View the public and private network connections to the Redis database</p></figcaption></figure>
{% endtab %}

{% tab title="Logs" %}
Monitor real-time log streams for troubleshooting and download logs for further analysis.

<figure><img src="/files/e3fmYNOMrzjZmkRzK0A4" alt="An image of the logs section of the Redis database deployed on Clouddley."><figcaption><p>Real-time logs for insights into database activity</p></figcaption></figure>
{% endtab %}

{% tab title="Users" %}
Manage a list of database users and securely reset passwords as needed.

<figure><img src="/files/JwKT0qFBAIS3lv7jmhDR" alt="An image of the users section of the Redis database deployed on Clouddley."><figcaption><p>Manage database users through the dashboard's users section</p></figcaption></figure>
{% endtab %}
{% endtabs %}

## Conclusion

Deploying a Redis database on Clouddley provides a fast, scalable, and hassle-free solution for database management. It ensures high performance and reliability, allowing you to focus on building and running your applications. Check out our[ other guides](/databases/how-to-guides) to learn more about deploying other database types on Clouddley.


# Deploy a MySQL Database on Clouddley

Learn how to deploy a MySQL database on Clouddley.

With [Clouddley](https://clouddley.com/triggr), you can easily deploy and manage a [MySQL](https://www.mysql.com/) database, a widely used open-source relational database known for its reliability and performance. This guide walks you through setting up a MySQL database on Clouddley. Whether you're a beginner or an experienced developer, you'll have your database running smoothly in no time.

## Prerequisites

* A [Clouddley](https://clouddley.com/) account
* A virtual machine on a Cloud platform or bare metal server.

## Step-by-step deployment

{% stepper %}
{% step %}

### Accessing Databases

* Log in to your [Clouddley](https://clouddley.com/) account.
* Navigate to [**Databases**](https://app.clouddley.com/services) and Click on **Deploy Database**

<figure><img src="/files/ruvrS2Z6oFAWXeTcQdEW" alt="Image of Triggr Databases dashboard."><figcaption><p>Accessing Databases</p></figcaption></figure>
{% endstep %}

{% step %}

### Configure the Virtual Machine (VM)

In the Choose or add server dropdown, select your virtual machine (VM) if it’s already listed. If not, select **+ Add Virtual Machine**.

Enter the required details:

<table><thead><tr><th width="127"></th><th></th></tr></thead><tbody><tr><td><strong>VM Host</strong></td><td><em>Provide the host address of your virtual machine.</em></td></tr><tr><td><strong>VM User</strong></td><td><em>Input the username required to access the virtual machine</em></td></tr><tr><td><strong>Port</strong></td><td><em>Specify the port number for the connection</em></td></tr></tbody></table>

* Use the **Clouddley CLI** (recommended) or connect via **SSH** to verify.

{% tabs %}
{% tab title="Clouddley CLI" %}
The Clouddley CLI is a command-line tool that allows you to interact with the Clouddley Platform from your terminal.

* Open the command line of the remote VM you want to configure to Clouddley and install Clouddley CLI by running the command:

```bash
curl -L https://raw.githubusercontent.com/clouddley/cli/main/install.sh | sh
```

* To add the SSH public key, run the command:

```bash
clouddley add key
```

Using the CLI, you can deploy resources, manage configurations, and automate tasks efficiently.
{% endtab %}

{% tab title="SSH" %}

* Download the public key to your local machine.
* Ru**n** the provided command on your local machine, allowing Clouddley to connect to your virtual machine.

```
ssh-copy-id -f -i ~/path/to/downloaded/Publickey username@ipaddress
```

{% hint style="info" %}
Replace `~/path/to/downloaded/Publickey` ,`username` and `ipaddress`  with your actual values.
{% endhint %}
{% endtab %}
{% endtabs %}

* Click on **Verify** to validate the details and confirm the connection.
* Click **Next** to proceed.

<figure><img src="/files/EXJ5A5sOylj5OrGiPmWe" alt="Configuring the virtual machine during database deployment on Clouddley."><figcaption><p>Configuring the virtual machine to host your database</p></figcaption></figure>
{% endstep %}

{% step %}

### Database Name

* Enter a unique **name** for your database for easy identification within the virtual machine (VM).
* Click on **Next**

<figure><img src="/files/ggcFtMV3JvP2p2F9uJTE" alt="Configuring database name on Clouddley."><figcaption><p>Defining a unique name for the MySQL database</p></figcaption></figure>
{% endstep %}

{% step %}

### Select the Database type and version

* Select MySQL from the dropdown menu
* Select the preferred **version** from the dropdown menu to ensure compatibility with your application.
* (Optional) Enable the Delete Protection option to prevent accidental deletion of your MariaDB database.

{% hint style="info" %}
This feature prevents the database from being destroyed unless explicitly disabled.
{% endhint %}

* Click on **Deploy DB**

<figure><img src="/files/5ANiG70ViNubXKLHuk6n" alt="User selecting the MySQL database type and version."><figcaption><p>Selecting the MySQL database type and specifying the version for deployment</p></figcaption></figure>
{% endstep %}

{% step %}

### Confirm Deployment

* Once the deployment is complete, your Redis database is ready.
* Click **Go to Dashboard** to access and manage your database.

<figure><img src="/files/OHOsvGtjx072XMotnqhE" alt="Image of MySQL database deployed successfully on Clouddley."><figcaption><p>MySQL database successfully deployed</p></figcaption></figure>
{% endstep %}
{% endstepper %}

## Database Dashboard

You can access and manage your database using the user-friendly dashboard interface.

{% tabs %}
{% tab title="Overview" %}
View details about your database, VM, and settings (e.g., Delete Protection), and use the option to delete the database if it is no longer needed.&#x20;

<figure><img src="/files/ktBfw0dHLAhNS0dYys64" alt="An image of the overview section of the MySQL database deployed on Clouddley."><figcaption><p>The dashboard overview with a high-level summary of database performance and status</p></figcaption></figure>
{% endtab %}

{% tab title="Connections" %}
Access public and private network details, including username, password, host, port, and database type.

<figure><img src="/files/17zUQzq8bpfpIwuQy7fv" alt="An image of the connections section of the MySQL database deployed on Clouddley."><figcaption><p>View the public and private network connections to the MySQL database</p></figcaption></figure>
{% endtab %}

{% tab title="Logs" %}
Monitor real-time log streams for troubleshooting and download logs for further analysis.

<figure><img src="/files/gSWRB9668jH9DJDzLAqw" alt="An image of the logs section of the MySQL database deployed on Clouddley."><figcaption><p>Real-time logs for insights into database activity</p></figcaption></figure>
{% endtab %}

{% tab title="Users" %}
Manage a list of database users and securely reset passwords as needed.

<figure><img src="/files/cL5CyHpNXvxObwntNCnU" alt="An image of the users section of the MySQL database deployed on Clouddley."><figcaption><p>Manage database users through the dashboard's users section</p></figcaption></figure>
{% endtab %}
{% endtabs %}

## Conclusion

Clouddley simplifies MySQL database deployment with its user-friendly interface, automated management, and scalable infrastructure. Whether you're handling small projects or large-scale applications, Clouddley ensures your database is properly managed. Explore our [other guides](/databases/how-to-guides) to discover more about deploying other databases on Clouddley.


# Extras

Find out more features and details about Databases.

{% content-ref url="/pages/iBwcdazHxv8GUUGW5teB" %}
[Database Networking on Clouddley](/databases/extras/database-networking-on-clouddley)
{% endcontent-ref %}

{% content-ref url="/pages/itu8C0vwa3hLS2PtCLaz" %}
[How to Reset Database Password on Clouddley](/databases/extras/how-to-reset-database-password-on-clouddley)
{% endcontent-ref %}


# Database Networking on Clouddley

Learn about database networking on Clouddley

Database networking determines how your database communicates with applications and other services. Clouddley provides detailed configurations for **public** and **private** networks, allowing users to use the best option based on their needs. This article covers the key differences and how to select the appropriate database network type on Clouddley.

## Understanding public and private networks

Understanding the differences between public and private networks helps ensure the right database networking choice is made based on security, performance, and accessibility requirements.

### Public Network

A public network allows external access to a database over the Internet, enabling remote connections for external applications and third-party integrations. However, it increases exposure to security threats, requiring strict measures such as IP whitelisting, firewall rules, and encryption. Additionally, internet traffic may introduce latency.

### Private Network

A private network keeps database connections within a secure environment, preventing direct internet access. It supports internal communication, microservices architectures, and enterprise systems with strict security policies. This setup reduces exposure to unauthorised access, improves connection speed and reliability, and enhances access control within a controlled environment.

#### Connecting over the private network

When configuring your database connection over the private network, you can set the host to either the **database name** (for internal connections only) or the **private IP address.**

{% hint style="info" %}
The **database name** is the one you configured when creating your database on Clouddley.&#x20;
{% endhint %}

<figure><img src="/files/rT4SBVnK3asW16yQeYOl" alt="Image highlighting the Database Name in the overview tab&#x27;s database information section."><figcaption><p>The database name in your database’s Overview tab.</p></figcaption></figure>

## Database Network Settings on Clouddley

Clouddley provides details for both **public** and **private** networks, allowing users to utilise them as needed for their database connections.

<figure><img src="/files/VDSFhnsb1WbPAxXxOm7V" alt="Public and Private network for Databases on Clouddley"><figcaption><p>Database networking connections tab.</p></figcaption></figure>

**Choosing the Right Network Type**

Users can use both public and private networks depending on their needs:

* **Public networks** are functional for remote access and integrations.
* **Private networks** offer secure, internal connectivity.

**Using the Public Network**

1. Retrieve the public connection details from Clouddley.

**Using the Private Network**

1. Retrieve private network details from Clouddley.
2. Ensure internal applications and services have the correct network permissions.
3. Use private IP addresses or VPC peering for secure connections.

## Conclusion

Clouddley provides users with public and private network details, ensuring flexibility in database connectivity. Public networks allow external access but require strict security controls, while private networks enhance security by keeping connections internal. By implementing best practices such as access restrictions and encryption, users can maintain a secure and optimised database network.


# How to Reset Database Password on Clouddley

Learn how to reset your database password on Clouddley

Resetting a database password is sometimes necessary for security or access recovery. With Clouddley, the process is simple and secure. This article walks you through the steps to reset your database password.

## Steps to Reset a Database Password

For this, we will be resetting the password of a PostgreSQL database user.

{% stepper %}
{% step %}
Navigate to the Databases dashboard and click on the database.

<figure><img src="/files/BiJbCjdke37qXsOkCDUk" alt="Clouddley database dashboard"><figcaption><p>Selecting the database to reset the password on the Clouddley dashboard</p></figcaption></figure>
{% endstep %}

{% step %}
In the **Users** tab, navigate to the **Actions** column, click the three-dot menu, and select **Reset Database**.

<figure><img src="/files/YRtMahvkgFvi6XUAG4xa" alt="PostgreSQL users tab displaying all users."><figcaption><p>Users tab displaying a list of all active users.</p></figcaption></figure>
{% endstep %}

{% step %}
Input the **database name** and click on **Reset Password**.

<figure><img src="/files/Id2x63RWQ8WgK1NFQ8J2" alt="Reset database user password on Clouddley pop up."><figcaption><p>Entering the database name for password reset.</p></figcaption></figure>
{% endstep %}
{% endstepper %}

Once you see this pop-up, you've successfully reset your Database password.

<figure><img src="/files/BPAUZyL1NE764jYsjnz3" alt="Successful password reset confirmation."><figcaption><p>Image of a successful password reset</p></figcaption></figure>

## Considerations After Resetting the Password

Once the password reset is successful, existing active connections will remain unaffected. However, users must log in again with the new password for any new sessions. To ensure a smooth transition and maintain security, consider the following:

* **Update Stored Credentials**: To avoid connection issues, update applications and services using the database with the new password.
* **Verify Access**: To confirm if the update was successful, test the new credentials by logging in.
* **Monitor for Unauthorized Access**: Check database logs for any failed login attempts, as old credentials may still be in use.

## Conclusion

Resetting a database password is a straightforward process on Clouddley, ensuring secure access without disrupting active connections. You can maintain smooth database operations by updating credentials in connected applications, verifying access, and following security best practices.&#x20;


# Servers

An overview of Servers on Clouddley

<figure><img src="/files/pxJnQWdbIXJLAqIjKd4q" alt="Image of servers dashboard on Clouddley"><figcaption><p>Servers on Clouddley</p></figcaption></figure>

Servers represent your compute resources connected to Clouddley for deploying applications and workloads. Whether it’s **VMs, bare metal,** or **cloud instances** like **AWS EC2 instances, Azure Virtual Machines, GCP Compute Engine, or DigitalOcean droplets,** Servers provide a way to add the compute resource on Clouddley. It simplifies the deployment process across different environments and platforms.

### Key Features

Here are the key features supported by Servers:

* **Connect to any Linux server**\
  Add Linux-based servers from any hosting provider.
* **Deploy with one click.**\
  Deploy applications and workloads across servers without writing custom scripts or manually accessing each machine via SSH.
* **Secure connections**\
  All server communication uses SSH encryption with automated key handling and immediate access revocation capabilities.
* **Resource cleanup**\
  Remove unused Docker images and containers to reclaim disk space on your servers.
* **Quick setup**\
  Connect new servers in under a minute using our command-line tool with minimal configuration steps.


# Add Servers

Learn how to add on Clouddley.

In Clouddley, a server is any compute resource (**VM, bare metal, or cloud instance**) where you deploy your workloads to. Servers lets you manage workloads from one place, deploy faster, and monitor everything together. By adding your servers to Clouddley, you can see the compute resources in use on your Clouddley account. This guide walks you through adding new servers to Clouddley and removing existing ones.

### Prerequisites

Before you begin, make sure you have:

* Have a [Clouddley](https://app.clouddley.com/) account
* Have a server with its details:
  * VM host&#x20;
  * VM port
  * VM user
* Basic familiarity with the command-line

### Add a Server

To add a server to your Clouddley account:

1. Sign in to your **Clouddley** account
2. Select **Servers**
3. Select  <mark style="color:blue;">**+**</mark> **Add Server**
4. Enter a **name** for the server
5. Complete the **VM host**, **VM user**, and **VM port** fields
6. Run the installation commands on your remote machine:

**Install Clouddley CLI**

```bash
curl -L https://raw.githubusercontent.com/clouddley/cli/main/install.sh | sh
```

**Add the SSH public key to the remote server**

```
clouddley add key
```

{% hint style="info" %}
Ensure you have the necessary permissions to run these commands.
{% endhint %}

7. Click on **Save**

<figure><img src="/files/TMmGa80S2fMycBFVH3n8" alt="Create server form" width="563"><figcaption><p>Creating a server on Clouddley</p></figcaption></figure>

You've successfully created a server on Clouddley!

### Troubleshooting Common Issues

<details>

<summary>Connection fails during setup</summary>

* Check that your VM host, port, and user details are correct
* Make sure port 22 (SSH) is open on your server
* Verify your server allows SSH connections

</details>

<details>

<summary>Permission denied when running commands</summary>

* Make sure your user has sudo privileges
* Check that you're using the correct username for your server

</details>

<details>

<summary>Server shows offline</summary>

* Confirm your server is running and accessible
* Try reconnecting by running the installation commands again

</details>

### Security Considerations

When you add a server to Clouddley:

* Clouddley adds its SSH public key to your server's authorized keys.
* All communication happens over encrypted SSH connections.
* You can revoke access by removing the Clouddley public key from your server.&#x20;

{% hint style="info" %}
Note that revoking access disrupts the connection between Clouddley and your server.
{% endhint %}

### Best Practices

* Server naming: Use descriptive names that help you quickly identify your servers.
* Regular maintenance: Run the cleanup regularly to free up disk space.


# Remove Servers

Learn how to remove servers from Clouddley.

To remove a server from Clouddley:

1. Select the server you want to delete.
2. In the upper-right corner, select **Delete.**
3. Enter the server name and click **Delete Server.**

<figure><img src="/files/99b9mddMTsrjqt4jUKwZ" alt="Server overview on Clouddley"><figcaption><p>Server overview on Clouddley</p></figcaption></figure>

Your server has been successfully removed!


# Clean Up Servers

Learn how to clean up docker images from servers on Clouddley.

Over time, unused Docker images can consume a significant amount of disk space on your servers on Clouddley. Cleaning them up helps free resources and keep the servers running smoothly.

Here is how to clean up your server:

1. Select the server you want to clean up.
2. At the bottom of the overview, click on **Clean Up**.
3. Enter the server **name**.
4. Click on **Clean Up Server.**

<figure><img src="/files/yIKOs8fON6mc688vyTak" alt="A gif showing how to clean up servers on Clouddley"><figcaption></figcaption></figure>

Once the cleanup is complete, it returns to the server’s overview page.


# Databases


# Supported PostgreSQL Extensions

A quick reference guide to all PostgreSQL extensions supported by Clouddley.

[PostgreSQL](https://www.postgresql.org/) is an open-source, object-relational database management system renowned for its extensibility, data integrity, and performance. The system maintains full ACID (Atomicity, Consistency, Isolation, Durability) compliance through its concurrency support and enables customisation through dynamic loading and catalogue-driven operations.

{% hint style="info" %}
[Extensions](https://www.postgresql.org/docs/current/extend-extensions.html) are pre-packaged collections of SQL objects that enhance PostgreSQL functionality, allowing users to add specialised features to their database without modifying the core system.
{% endhint %}

### Managing PostgreSQL Extensions

Before running the commands below, log in to your PostgreSQL database using `psql`:

```
psql -h <host> -p <port> -U <username> -d <database_name>
```

{% hint style="info" %}
Replace the placeholder values above with your actual database connection details.
{% endhint %}

Once connected, you can manage PostgreSQL extensions in Databases using the following commands:

* Installing supported extensions command:<br>

  ```bash
  CREATE EXTENSION <extension-name>;
  ```

* Upgrading extensions command:<br>

  ```bash
  ALTER EXTENSION <extension-name> UPDATE;
  ```

* Disable extensions command:<br>

  <pre class="language-bash"><code class="lang-bash"><strong>DROP EXTENSION &#x3C;extension-name>;
  </strong></code></pre>

* List currently installed extensions command:<br>

  ```bash
  \dx
  ```

### Available Extensions

To see what extensions are available in your database, you can run this command from the command line using **psql**:

```bash
SELECT * FROM pg_available_extensions;
```

<details>

<summary>View Available Extensions - Example</summary>

You can find your connection details on your  Database dashboard:

<figure><img src="/files/64sdHtbBu4LcLENdzPH6" alt="An image of the connections section of the PostgreSQL database deployed on Clouddley."><figcaption><p>Connections tab of a PostgreSQL database deployed on Clouddley</p></figcaption></figure>

**Example with sample values:**

Log in using psql by running this command:

```
psql -h 78.47.225.173 -p 14295 -U triggradmin -d postgres
```

Once you are connected, run the command:

```
SELECT * FROM pg_available_extensions;
```

You will see an output like the one below

```
             name             | default_version | installed_version |                                                       comment                                     

------------------------------+-----------------+-------------------+---------------------------------------------------------------------------------------------------------------------
 sslinfo                      | 1.2             |                   | information about SSL certificates
 cube                         | 1.5             |                   | data type for multidimensional cubes
 citext                       | 1.6             |                   | data type for case-insensitive character strings
 seg                          | 1.4             |                   | data type for representing line segments or floating-point intervals
 btree_gist                   | 1.7             |                   | support for indexing common datatypes in GiST
 plpgsql                      | 1.0             | 1.0               | PL/pgSQL procedural language
 xml2                         | 1.1             |                   | XPath querying and XSLT
 insert_username              | 1.0             |                   | functions for tracking who changed a table
```

</details>

Clouddley PostgreSQL Database comes with support for the PostgreSQL extensions listed below.&#x20;

<table><thead><tr><th>Extension Name</th><th width="488.0001220703125">Description</th></tr></thead><tbody><tr><td>address_standardizer</td><td>Used to parse an address into constituent elements. Generally used to support geocoding address normalization step.</td></tr><tr><td>address_standardizer_data_us</td><td>Address Standardizer US dataset example</td></tr><tr><td>adminpack</td><td>administrative functions for PostgreSQL</td></tr><tr><td>amcheck</td><td>functions for verifying relation integrity</td></tr><tr><td>autoinc</td><td>functions for autoincrementing fields</td></tr><tr><td>bloom</td><td>bloom access method - signature file based index</td></tr><tr><td>btree_gin</td><td>support for indexing common datatypes in GIN</td></tr><tr><td>btree_gist</td><td>support for indexing common datatypes in GiST</td></tr><tr><td>citext</td><td>data type for case-insensitive character strings</td></tr><tr><td>cube</td><td>data type for multidimensional cubes</td></tr><tr><td>dblink</td><td>connect to other PostgreSQL databases from within a database</td></tr><tr><td>dict_int</td><td>text search dictionary template for integers</td></tr><tr><td>dict_xsyn</td><td>text search dictionary template for extended synonym processing</td></tr><tr><td>earthdistance</td><td>calculate great-circle distances on the surface of the Earth</td></tr><tr><td>file_fdw</td><td>foreign-data wrapper for flat file access</td></tr><tr><td>fuzzystrmatch</td><td>determine similarities and distance between strings</td></tr><tr><td>hstore</td><td>data type for storing sets of (key, value) pairs</td></tr><tr><td>insert_username</td><td>functions for tracking who changed a table</td></tr><tr><td>intagg</td><td>integer aggregator and enumerator (obsolete)</td></tr><tr><td>intarray</td><td>functions, operators, and index support for 1-D arrays of integers</td></tr><tr><td>isn</td><td>data types for international product numbering standards</td></tr><tr><td>lo</td><td>Large Object maintenance</td></tr><tr><td>ltree</td><td>data type for hierarchical tree-like structures</td></tr><tr><td>moddatetime</td><td>functions for tracking last modification time</td></tr><tr><td>old_snapshot</td><td>utilities in support of old_snapshot_threshold</td></tr><tr><td>orafce</td><td>Functions and operators that emulate a subset of functions and packages from the Oracle RDBMS</td></tr><tr><td>pageinspect</td><td>inspect the contents of database pages at a low level</td></tr><tr><td>pg_buffercache</td><td>examine the shared buffer cache</td></tr><tr><td>pg_freespacemap</td><td>examine the free space map (FSM)</td></tr><tr><td>pg_prewarm</td><td>prewarm relation data</td></tr><tr><td>pg_stat_statements</td><td>track planning and execution statistics of all SQL statements executed</td></tr><tr><td>pg_surgery</td><td>extension to perform surgery on a damaged relation</td></tr><tr><td>pg_trgm</td><td>text similarity measurement and index searching based on trigrams</td></tr><tr><td>pg_visibility</td><td>examine the visibility map (VM) and page-level visibility info</td></tr><tr><td>pg_walinspect</td><td>functions to inspect contents of PostgreSQL Write-Ahead Log</td></tr><tr><td>pgaudit</td><td>provides auditing functionality</td></tr><tr><td>pgautofailover</td><td>pg_auto_failover</td></tr><tr><td>pgcrypto</td><td>cryptographic functions</td></tr><tr><td>pgrowlocks</td><td>show row-level locking information</td></tr><tr><td>pgstattuple</td><td>show tuple-level statistics</td></tr><tr><td>pljava</td><td>PL/Java procedural language (https://tada.github.io/pljava/)</td></tr><tr><td>plpgsql</td><td>PL/pgSQL procedural language</td></tr><tr><td>postgis</td><td>PostGIS geometry and geography spatial types and functions</td></tr><tr><td>postgis_raster</td><td>PostGIS raster types and functions</td></tr><tr><td>postgis_tiger_geocoder</td><td>PostGIS tiger geocoder and reverse geocoder</td></tr><tr><td>postgis_topology</td><td>PostGIS topology spatial types and functions</td></tr><tr><td>postgres_fdw</td><td>foreign-data wrapper for remote PostgreSQL servers</td></tr><tr><td>refint</td><td>functions for implementing referential integrity (obsolete)</td></tr><tr><td>seg</td><td>data type for representing line segments or floating-point intervals</td></tr><tr><td>sslinfo</td><td>information about SSL certificates</td></tr><tr><td>tablefunc</td><td>functions that manipulate whole tables, including crosstab</td></tr><tr><td>tcn</td><td>Triggered change notifications</td></tr><tr><td>tsm_system_rows</td><td>TABLESAMPLE method which accepts number of rows as a limit</td></tr><tr><td>tsm_system_time</td><td>TABLESAMPLE method which accepts time in milliseconds as a limit</td></tr><tr><td>unaccent</td><td>text search dictionary that removes accents</td></tr><tr><td>uuid-ossp</td><td>generate universally unique identifiers (UUIDs)</td></tr><tr><td>xml2</td><td>XPath querying and XSLT</td></tr></tbody></table>